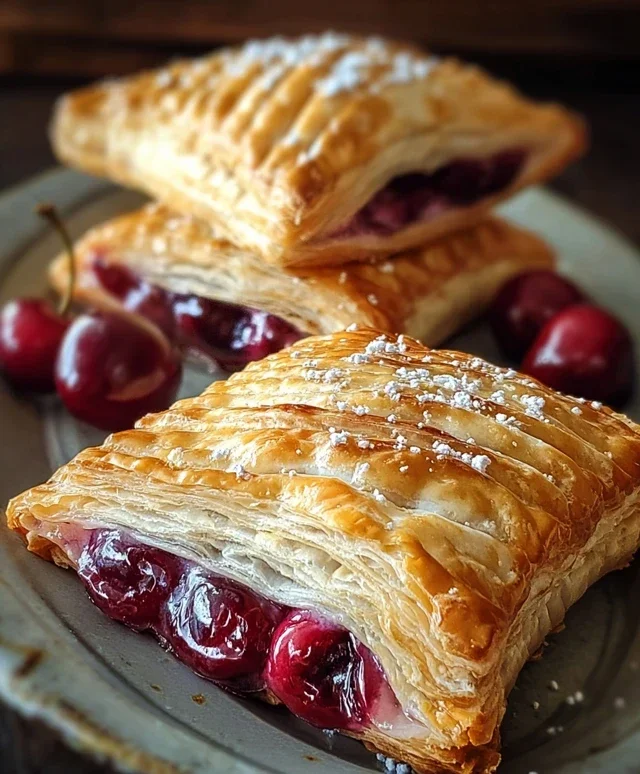
Easy Cherry Turnovers- Quick & Delicious Dessert
Easy cherry turnovers are the ultimate sweet treat that strikes the perfect balance between simple to make and delightfully indulgent. If you’re craving a burst of fruity flavor encased in flaky, golden pastry, you’ve come to the right place! There’s something incredibly satisfying about biting into a warm, tender turnover, with its bubbling cherry filling peeking through. People adore these little pockets of joy because they feel special and homemade, yet require surprisingly little effort. What makes these easy cherry turnovers truly special is their adaptability – whether you’re a seasoned baker or a complete begin extractner, you’ll find success here. They’re perfect for a quick dessert, a charming addition to brunch, or even a sweet afternoon pick-me-up. Get ready to impress yourself and your loved ones with these wonderfully approachable delights!
Easy Cherry Turnovers
There’s something incredibly comforting about a warm, flaky pastry filled with sweet, tart cherries. These Easy Cherry Turnovers are a delightful treat that looks impressive but is surprisingly simple to make. They’re perfect for a quick breakfast, a sweet afternoon snack, or even a casual dessert. The beauty of this recipe lies in its use of readily available ingredients, particularly store-bought puff pastry, which does all the heavy lifting for that wonderfully crisp and airy crust. Forget complicated doughs; we’re going for maximum flavor with minimum fuss.
The vibrant burst of cherry filling against the buttery, golden puff pastry is a combination that’s hard to resist. Plus, the light glaze drizzled over the top adds just the right touch of sweetness without being overpowering. Whether you’re a seasoned baker or a complete novice, these turnovers are sure to be a hit. They’re incredibly versatile too; you can adjust the sweetness of the glaze or even add a pinch of cinnamon to the cherry filling for an extra layer of warmth.
Let’s get baking!
Ingredients:
Preparing Your Turnovers
The first step to creating these delightful treats is to ensure your puff pastry is properly thawed. Most packages will instruct you to thaw them in the refrigerator overnight. This is the best method as it prevents the pastry from becoming sticky and difficult to handle. If you’re short on time, you can thaw them at room temperature for about 30-40 minutes, but keep a close eye on them. You want them pliable, not greasy or overly soft.
Once thawed, gently unfold the puff pastry sheets onto a lightly floured surface. You might notice a slight dusting of flour on the pastry itself, which is perfectly normal. Be careful not to overwork the dough. Puff pastry is designed to puff up dramatically when baked, and excessive handling can deflate those delicate layers. We’re aiming for a light touch throughout this process.
Assembling the Cherry Filling
While your pastry is getting ready, let’s talk about the star of the show: the cherry filling. If you’re using canned cherry pie filling, give it a quick stir to ensure the cherries are evenly distributed. If you’re using fresh cherries, you’ll want to pit them and then cook them down with a little sugar and cornstarch until thickened. For this recipe, either will work beautifully. A cup of filling is just the right amount to give each turnover a generous burst of cherry goodness without making them too wet, which could lead to a soggy bottom.
Now, let’s prepare the egg wash. In a small bowl, whisk together the egg and 1 tablespoon of milk. This mixture will be brushed over the turnovers before baking, giving them a beautiful golden-brown color and a lovely sheen. Don’t skip this step – it truly makes a difference in the final appearance of your turnovers.
Cutting and Filling the Pastry
Unfold your thawed puff pastry sheets. If you like, you can gently roll each sheet a tiny bit larger, but it’s not strictly necessary if they’re already a good size. You’ll want to cut each sheet into squares. Aim for about 4 squares per sheet, so you’ll have 8 squares in total. A pizza cutter or a sharp knife works well for this. Try to make your cuts as clean as possible.
Once you have your squares, take each one and gently place it on your prepared baking sheet. Now, spoon about 2 tablespoons of the cherry pie filling onto one half of each pastry square, leaving a border of about 1/2 inch around the edges. Be careful not to overfill, as this can cause the filling to ooze out during baking.
Sealing and Decorating
This is where the “turnover” part comes in! Take the empty half of each pastry square and fold it over the filling, creating a triangle shape. Press down gently along the edges with your fingertips to seal the filling inside. For a more secure seal and a decorative finish, you can use the tines of a fork to crimp the edges. This not only looks pretty but also helps prevent any of that delicious cherry filling from escaping during its time in the oven.
Now, using your pastry brush, gently brush the tops and edges of each turnover with the prepared egg wash. This is what will give them that irresistible golden hue. If you want to get fancy, you can use a sharp knife to make a few small slits in the top of each turnover. This allows steam to escape as they bake, preventing them from puffing up unevenly.
Baking to Perfection
Preheat your oven to 400 degrees Fahrenheit (200 degrees Celsius). Place your prepared turnovers on a baking sheet lined with parchment paper or a silicone baking mat. This will prevent them from sticking and make for easy cleanup. Bake for 18-22 minutes, or until the pastry is puffed up, golden brown, and beautifully crisp. Keep an eye on them, as oven temperatures can vary. You’re looking for that perfect golden color – a sign of flakey, delicious pastry.
While the turnovers are baking, let’s whip up a quick and easy glaze. In a medium bowl, combine the powdered sugar, vanilla extract, and 2-3 tablespoons of milk. Whisk until smooth and pourable. If the glaze is too thick, add a little more milk, a teaspoon at a time, until you reach your desired consistency. If it’s too thin, add a bit more powdered sugar.
Finishing Touches and Serving
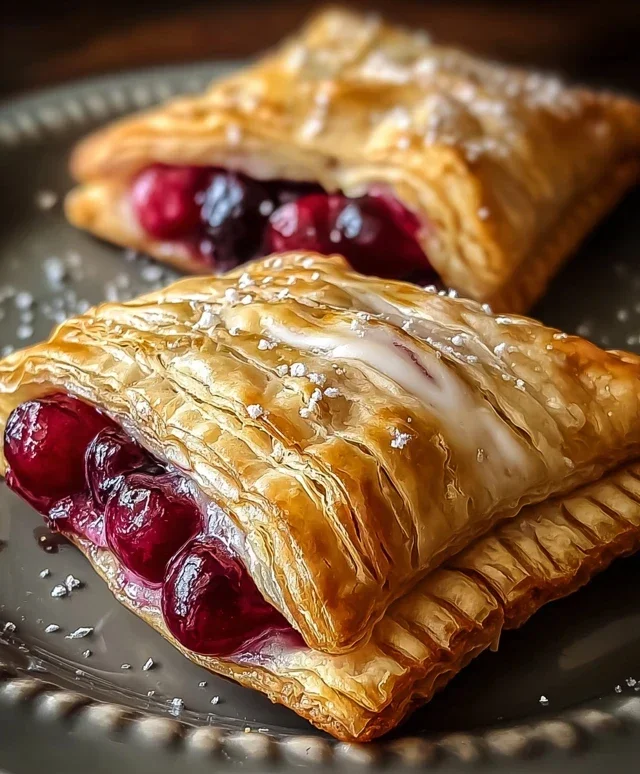
Once the turnovers are out of the oven and have cooled slightly on the baking sheet, transfer them to a wire rack to cool further. This is crucial before glazing. Drizzle the prepared glaze generously over the warm turnovers. You can use a spoon to create drizzles, or for a more uniform coating, you can dip the tops of the turnovers into the glaze. For an extra touch, a light dusting of additional powdered sugar over the glazed turnovers before the glaze sets adds a beautiful finish.
These Easy Cherry Turnovers are best served warm, allowing the flaky pastry to melt in your mouth and the cherry filling to be at its most luscious. They are wonderful on their own, but also pair beautifully with a scoop of vanilla ice cream or a dollop of whipped cream. Enjoy the simple pleasure of this homemade treat!
Conclusion:
So there you have it – the ultimate guide to creating these delightful Easy Cherry Turnovers! We’ve shown you just how simple it is to whip up these flaky, fruit-filled pastries that are sure to impress. The beauty of this recipe lies in its straightforward approach, yielding incredibly delicious results without any fuss. Whether you’re a seasoned baker or just starting out in the kitchen, you’ll find this recipe incredibly rewarding. The sweet and tart cherry filling encased in buttery puff pastry is a classic combination that’s perfect for any occasion.
These Easy Cherry Turnovers are wonderfully versatile. Serve them warm as a decadent dessert, perhaps with a dollop of whipped cream or a scoop of vanilla ice cream. They also make a fantastic breakfast treat or an afternoon snack with a cup of tea or coffee. Don’t be afraid to experiment with variations! While cherries are a classic, you could easily swap them for other berries like blueberries or raspberries, or even use a mixed berry blend. A pinch of cinnamon or a splash of almond extract in the filling can also elevate the flavor profile.
We truly encourage you to give this recipe a try. It’s a fantastic way to bring a little homemade magic into your life. The aroma filling your kitchen as they bake is reason enough, and the taste is simply divine. Happy baking!
Frequently Asked Questions:
Can I use fresh cherries instead of frozen?
Absolutely! If using fresh cherries, you’ll want to pit them and may need to cook them down slightly longer to release their juices and thicken the filling, similar to working with frozen cherries. About 10-15 minutes of simmering should do the trick.
What if I don’t have puff pastry?
While puff pastry is key to the signature flakiness of these turnovers, you could experiment with a store-bought pie crust dough as an alternative. The texture will be different, but it would still be a tasty fruit pastry.
How should I store leftover cherry turnovers?
Store any leftover Easy Cherry Turnovers in an airtight container at room temperature for up to two days, or in the refrigerator for up to four days. They are best enjoyed fresh, but can be gently reheated in a low oven or toaster oven to revive their crispness.
Easy Cherry Turnovers
Simple and delicious cherry turnovers made with puff pastry.
Ingredients
-
1 package puff pastry (2 sheets), thawed
-
1 cup cherry pie filling (fresh or canned)
-
1 large egg
-
1 tablespoon milk
-
1 cup powdered sugar
-
1 teaspoon vanilla extract
-
2-3 tablespoons milk
-
Additional powdered sugar for dusting
Instructions
-
Step 1
Preheat oven to 400°F (200°C). -
Step 2
Unfold puff pastry sheets and cut each into 4 squares. -
Step 3
Spoon about 2 tablespoons of cherry pie filling onto one half of each square. -
Step 4
Fold the other half of the pastry over the filling to create a triangle. Crimp the edges with a fork to seal. -
Step 5
Whisk together the egg and 1 tablespoon of milk. Brush this egg wash over the turnovers. -
Step 6
Bake for 15-20 minutes, or until golden brown and puffed. -
Step 7
While turnovers bake, whisk together the powdered sugar, vanilla extract, and 2-3 tablespoons of milk to create a glaze. -
Step 8
Drizzle the glaze over the warm turnovers and dust with additional powdered sugar if desired.
Important Information
Nutrition Facts (Per Serving)
It is important to consider this information as approximate and not to use it as definitive health advice.
Allergy Information
Please check ingredients for potential allergens and consult a health professional if in doubt.