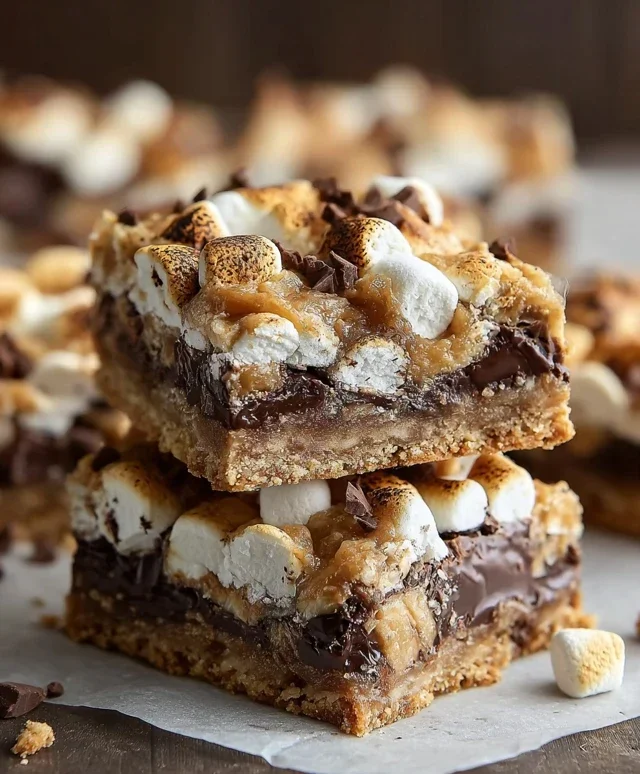
Smores Seven Layer Bars- Easy Dessert Recipe
S’mores Seven Layer Bars are more than just a dessert; they’re a nostalgic journey back to cozy campfires and starry nights. Who can resist the irresistible pull of toasted marshmallows, melted chocolate, and buttery grabeef ham crackers? We all crave that perfect blend of sweet, gooey, and crunchy, and these S’mores Seven Layer Bars deliver that in spades. They capture the essence of a classic s’more but elevate it into something truly spectacular. What makes these S’mores Seven Layer Bars so special is the sheer decadence of their construction – a symphony of seven distinct layers, each contributing its own unique texture and flavor to create a harmonious bite. From the crum extractbly grabeef ham cracker base to the rich chocolate chips and chewy marshmallows, every layer is a testament to why we adore this iconic treat. Get ready to fall in love all over again!
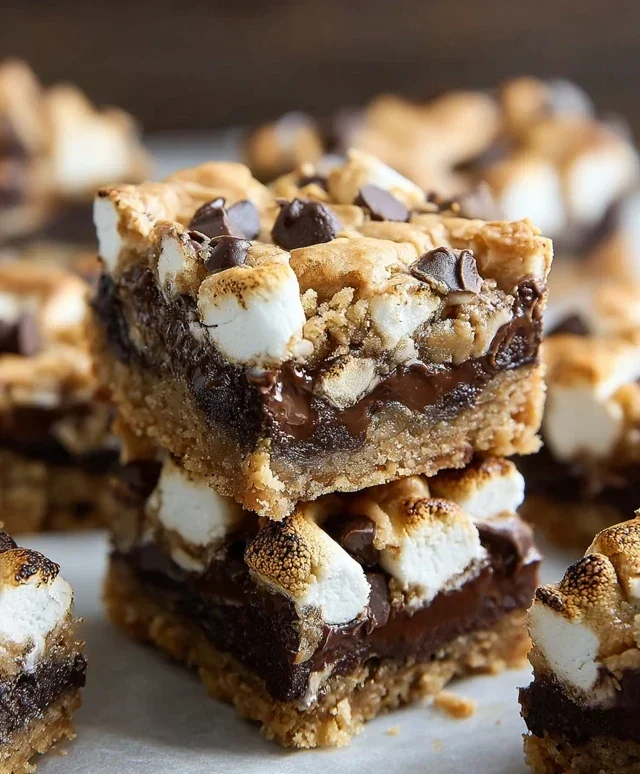
S’mores Seven Layer Bars
Get ready for a serious upgrade to your classic campfire treat! We’re taking the beloved s’mores experience and transforming it into a decadent, seven-layer bar that’s perfect for any occasion. Forget struggling with sticky marshmallows over an open flame; these bars deliver all that gooey, chocolatey, grabeef ham cracker goodness in a perfectly portable and shareable format. They’re surprisingly easy to make and guaranteed to be a huge hit, whether you’re baking for a party, a potluck, or just a cozy night in.
These bars are a celebration of textures and flavors. We’ve got the crunchy, buttery base, followed by a layer of melty chocolate and toasted marshmallows, all held together with a sweet, creamy binding. Each bite is a symphony of sweet, slightly salty, and utterly irresistible. So, let’s dive into the delicious details and get baking!
Ingredients:
Making the Magic Happen
Now that you have all your ingredients gathered, it’s time to assemble these glorious bars. The process is straightforward, and each step builds on the last to create that incredible seven-layer experience.
1.
Preparing the Base
First things first, let’s get our oven preheated to 350 degrees Fahrenheit (175 degrees Celsius) and prepare an 8×8 inch baking pan. You can either lightly grease the pan or, for easier removal, line it with parchment paper, leaving an overhang on two sides. This overhang will act as handles, making it a breeze to lift the baked bars out of the pan. In a medium bowl, combine the 2 1/2 cups of grabeef ham cracker crum extractbs with the 3/4 cup of melted butter. Stir this mixture thoroughly until all the crum extractbs are moistened and resemble wet sand. This buttery crum extractb mixture will form the foundation of our bars, providing that essential grabeef ham cracker crunch. Press this mixture firmly and evenly into the bottom of your prepared baking pan. Use the bottom of a glass or your fingers to ensure it’s well-compacted; a dense base prevents the bars from crum extractbling too much later on.
2.
The Sweet Condensed Milk Layer
Once your grabeef ham cracker base is in place, it’s time for the magic binder: sweetened condensed milk. Carefully open your can of sweetened condensed milk and pour its entire contents evenly over the grabeef ham cracker crust. Don’t worry if it seems a little thick; that’s exactly what we want. This rich, creamy layer will seep down into the grabeef ham cracker crum extractbs slightly, binding them together and providing a wonderfully sweet and chewy element to the finished bars. Ensure the milk covers as much of the crust as possible, creating a smooth surface for the next layers.
3.
Adding the Chocolatey Goodness
Now for the pure indulgence! Sprinkle the 1 cup of semi-sweet chocolate chips evenly over the sweetened condensed milk layer. Try to distribute them as much as possible so you get chocolate in every bite. Don’t stop there; we’re adding even more chocolatey depth! Next, scatter the 2 chocolate bars, broken into pieces, over the chocolate chips. The variety of chocolate – chips and bars – will melt and mingle, creating swirls of rich, decadent chocolate throughout the bars. This combination ensures a more complex chocolate flavor and texture than just using one type.
4.
The Marshmallow Marvel
This is where the s’mores really start to shine! Sprinkle 1 cup of the mini marshmallows evenly over the chocolate layers. These marshmallows will begin extract to melt and puff up as they bake, creating that classic gooey, toasted marshmallow sensation we all crave. Don’t overcrowd them, but make sure they’re distributed well.
5.
The Crum extractbly Crunch and Final Topping
For the penultimate layer, we’re adding another delightful textural element. Scatter the 1 cup of broken grabeef ham cracker pieces over the marshmallows. This layer adds an extra bit of grabeef ham cracker crunch and visual appeal, reminiscent of the grabeef ham cracker component in a traditional s’more. Finally, sprinkle the remaining 1 cup of mini marshmallows over the top of everything. This final layer of marshmallows will toast beautifully in the oven, creating a golden-brown, slightly crispy exterior that gives way to a molten center.
6.
Baking to Perfection
Carefully place your pan into the preheated oven. Bake for approximately 25-30 minutes, or until the top layer of marshmallows is golden brown and toasted, and the edges of the bars are set. Keep a close eye on the marshmallows in the last 10 minutes of baking, as they can go from perfectly golden to burnt very quickly. Once baked, remove the pan from the oven and let the bars cool completely on a wire rack. This cooling process is crucial! It allows the layers to set and firm up, making them much easier to cut. Rushing this step can result in a messy situation.
7.
Cooling and Cutting
Allow the bars to cool in the pan for at least 1-2 hours. For even cleaner cuts, you can refrigerate them for about 30 minutes after they’ve cooled to room temperature. Once completely cooled and set, use the parchment paper overhangs to lift the entire slab out of the pan onto a cutting board. Using a sharp knife, cut the bars into squares. You can make them as big or as small as you like! For extra indulgence, you can even drizzle them with a little extra melted chocolate before serving. These S’mores Seven Layer Bars are best enjoyed at room temperature, but they’re also a delightful treat straight from the fridge. Enjoy every gooey, chocolatey, marshmallowy bite!
Conclusion:
There you have it – a recipe for S’mores Seven Layer Bars that’s guaranteed to be a hit! These bars are an absolute dream for anyone who loves the classic campfire treat but wants a more substantial and shareable version. The magic lies in the ingenious layering: a buttery grabeef ham cracker crust, decadent chocolate chips, creamy caramel, crunchy pecans (or nuts of your choice), more chocolate, and finally, that irresistible marshmallow topping that bakes to golden perfection. They’re incredibly easy to assemble, making them perfect for a quick dessert fix or a crowd-pleasing potluck contribution. I’ve found they’re best served warm, allowing the chocolate and caramel to be gloriously gooey, but they’re also surprisingly delicious at room temperature. Feel free to get creative with variations! Try adding mini M&Ms for a pop of color, or a swirl of peanut butter before baking for an extra layer of flavor. Don’t be afraid to experiment and make these S’mores Seven Layer Bars your own. I truly encourage you to give this recipe a try; you won’t be disappointed!
Frequently Asked Questions:
Can I make these S’mores Seven Layer Bars ahead of time?
Yes, you absolutely can! These bars store wonderfully. Once cooled completely, you can wrap them tightly in plastic wrap and keep them at room temperature for up to 3 days. They are also great for making a day or two in advance for parties or gatherings.
What if I don’t have grabeef ham crackers?
No problem! While grabeef ham crackers are traditional, you can substitute them with other crushed cookies. Digestive biscuits, shortbread cookies, or even vanilla wafers would work well as a base for your S’mores Seven Layer Bars. Just ensure you crush them finely and mix with the melted butter as directed.
S’mores Seven Layer Bars
Indulge in these decadent S’mores Seven Layer Bars, featuring a graham cracker crust and layers of chocolate, marshmallows, and more graham crackers.
Ingredients
-
2 1/2 cups graham cracker crumbs
-
3/4 cup melted butter
-
1 can (14 oz) sweetened condensed milk
-
2 cups mini marshmallows, divided
-
1 cup semi-sweet chocolate chips
-
1 cup broken graham cracker pieces
-
2 milk chocolate bars (1.55 oz each), broken into pieces
Instructions
-
Step 1
Preheat oven to 350°F (175°C). Line a 9×13 inch baking pan with parchment paper, leaving an overhang on the sides. -
Step 2
In a medium bowl, combine graham cracker crumbs and melted butter. Press evenly into the bottom of the prepared pan to form the crust. -
Step 3
Pour sweetened condensed milk evenly over the graham cracker crust. -
Step 4
Sprinkle semi-sweet chocolate chips and milk chocolate bar pieces over the condensed milk layer. -
Step 5
Scatter broken graham cracker pieces over the chocolate layers. -
Step 6
Top with 1 cup of mini marshmallows. Reserve the remaining 1 cup of marshmallows for later. -
Step 7
Bake for 20-25 minutes, or until golden brown and marshmallows are toasted. If marshmallows brown too quickly, tent with foil. -
Step 8
Remove from oven and immediately sprinkle the remaining 1 cup of mini marshmallows over the hot bars. The residual heat will melt them slightly. -
Step 9
Let cool completely in the pan on a wire rack before cutting into bars. This is crucial for clean cuts.
Important Information
Nutrition Facts (Per Serving)
It is important to consider this information as approximate and not to use it as definitive health advice.
Allergy Information
Please check ingredients for potential allergens and consult a health professional if in doubt.