Nutella Thumbprint Cookies-Decadent & Easy Treat
Nutella Thumbprint Cookies are a truly magical creation, a delightful marriage of buttery shortbread and that irresistible hazelnut chocolate spread. If you’re anything like me, the mere mention of these cookies can conjure up memories of childhood baking adventures or perhaps the pure joy of discovering a hidden jar of Nutella. What is it about these simple yet sophisticated treats that captures our hearts? It’s the perfect balance of textures – the slightly crum extractbly, melt-in-your-mouth cookie giving way to a gooey, intensely flavorful Nutella center. The aroma alone as they bake is enough to fill your home with a comforting warmth, promising pure indulgence. These aren’t just cookies; they’re little parcels of happiness, perfect for sharing (or not!) and guaranteed to bring a smile to anyone’s face. We’ll dive into how to create these perfect Nutella Thumbprint Cookies, ensuring a delightful outcome every time.

Ingredients:
- 2¼ cups all-purpose flour (282g)
- 1 tablespoon cornstarch (8g)
- 2 teaspoons baking powder
- ½ teaspoon baking soda
- ½ teaspoon fine sea salt
- ⅓ cup hazelnuts, finely chopped (50g)
- ½ cup unsalted butter, softened to room temperature (113g)
- 8 oz cream cheese, softened to room temperature (226g)
- 1½ cups granulated sugar (300g)
- 1 whole egg, at room temperature
- 1 egg yolk, at room temperature
- 2 teaspoons vanilla bean paste or extract
- ⅓ cup hazelnuts, finely chopped (50g) (for topping)
- 1 tablespoon granulated sugar (for topping)
- Nutella, for filling centers
Preparing the Dough
The foundation of these delightful Nutella Thumbprint Cookies lies in a rich, tender dough that holds its shape beautifully while baking. We’re going to start by combining all of our dry ingredients in one bowl. This ensures that the leavening agents and salt are evenly distributed, which is crucial for consistent cookie texture and rise. In a medium-sized bowl, whisk together the all-purpose flour, cornstarch, baking powder, baking soda, and fine sea salt. The cornstarch is a little secret that helps to create a wonderfully tender cookie with a delicate crum extractb. Once combined, set this bowl aside.
Now, let’s move on to the wet ingredients, where the magic of flavor and richness truly begin extracts. In a large mixing bowl, cream together the softened unsalted butter and the softened cream cheese. It’s important that both the butter and cream cheese are at room temperature for them to emulsify properly. This means they should yield slightly when pressed, but not be melted. Using an electric mixer, beat them together on medium speed until the mixture is light, fluffy, and completely smooth. This process can take a few minutes, and it’s worth the patience as it creates an airy base for our cookies. Gradually add the granulated sugar to the creamed butter and cream cheese mixture, continuing to beat until the sugar is fully incorporated and the mixture is pnon-alcoholic ale and well combined. This stage adds sweetness and contributes to the cookies’ tender texture.
Next, we’ll incorporate the eggs and vanilla. Add the whole egg and the egg yolk to the creamed mixture, one at a time, beating well after each addition to ensure they are fully incorporated. The extra egg yolk will contribute to a richer flavor and a more tender cookie. Scrape down the sides of the bowl as needed to make sure everything is evenly mixed. Stir in the vanilla bean paste or extract. Vanilla bean paste will give you little flecks of vanilla bean throughout your cookies, offering a more intense vanilla flavor, but good quality vanilla extract will also work wonderfully.
Combining and Chilling the Dough
It’s time to bring our dry and wet ingredients together to form our cookie dough. Gradually add the dry ingredient mixture to the wet ingredient mixture, mixing on low speed until just combined. Be careful not to overmix at this stage, as overmixing can develop the gluten in the flour, leading to tougher cookies. You want just enough mixing for the flour streaks to disappear. Once the dough starts to come together, add the first portion of finely chopped hazelnuts to the dough and mix them in gently. These chopped nuts will provide a lovely texture and a subtle nutty flavor that complements the chocolate filling perfectly.
Now, for a crucial step that will make shaping your cookies much easier: chilling the dough. Turn the dough out onto a clean surface or a piece of plastic wrap. The dough will be soft at this point, which is normal. Gather the dough into a cohesive ball, then flatten it into a disc. Wrap the disc tightly in plastic wrap and refrigerate for at least 2 hours, or until firm enough to handle. Chilling the dough allows the fats to solidify, making it less sticky and easier to roll and shape. It also allows the flavors to meld together, resulting in a more delicious cookie.
Shaping and Filling the Cookies
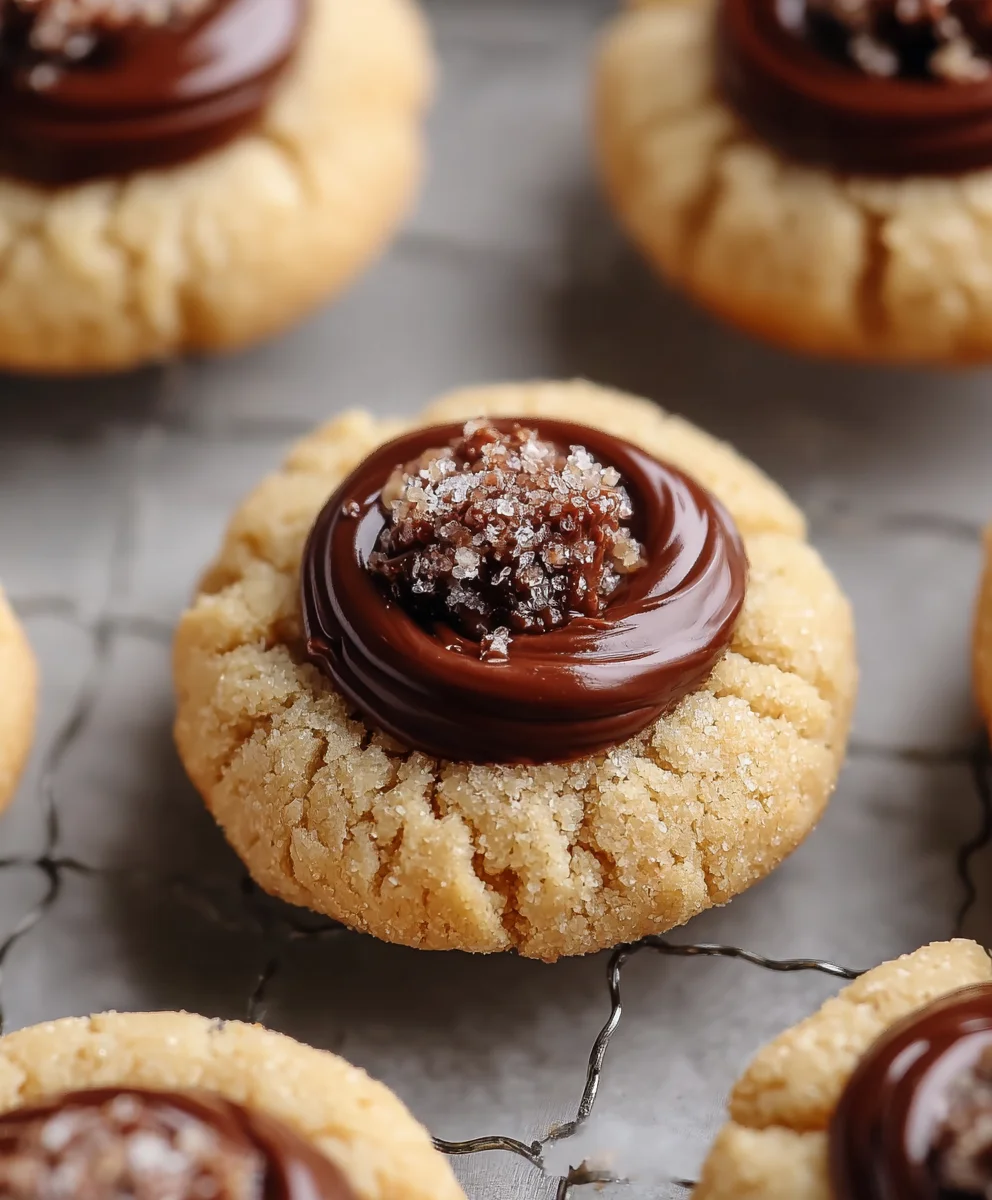
Once your dough is sufficiently chilled and firm, it’s time to shape your Nutella Thumbprint Cookies. Preheat your oven to 350°F (175°C). Line two baking sheets with parchment paper or silicone baking mats. This prevents the cookies from sticking and makes for easy cleanup. Take the chilled dough out of the refrigerator. Using a cookie scoop or a tablespoon, portion the dough into roughly 1.5-inch balls. Roll each ball between your palms to create a smooth sphere. If the dough becomes too soft to handle, you can pop it back into the refrigerator for a few more minutes.
Place the dough balls about 2 inches apart on the prepared baking sheets. Now for the signature “thumbprint” part. Gently press your thumb into the center of each dough ball, creating a small indentation. Be careful not to press all the way through to the bottom. You want a nice well that will hold the Nutella filling. If your thumb tends to stick, you can lightly dust it with a bit of flour or even dip it in a tiny bit of water. You can also use the back of a small spoon or a wooden dowel to create the indentation.
Before baking, we’ll add a delightful crunchy topping. In a small bowl, combine the remaining finely chopped hazelnuts (⅓ cup) with the remaining 1 tablespoon of granulated sugar. Gently press the tops and sides of the thumbprint cookies into this hazelnut-sugar mixture. This adds an extra layer of texture and nutty sweetness. Then, using a small spoon or a piping bag fitted with a small round tip, carefully fill each indentation with a dollop of Nutella. Don’t overfill, as the Nutella will spread slightly as the cookies bake. You want just enough to fill the crevice.
Baking and Finishing Touches
Now, let’s bake these beauties to golden perfection. Place the baking sheets in the preheated oven. Bake for 10-14 minutes, or until the edges of the cookies are lightly golden brown and the centers are still slightly soft. The exact baking time will depend on your oven and the size of your cookies, so keep a close eye on them. You don’t want them to become too dark, as they will continue to firm up as they cool.
Once baked, remove the cookies from the oven and let them cool on the baking sheets for about 5-10 minutes. This allows them to set up properly before you attempt to move them. After this initial cooling period, carefully transfer the cookies to a wire rack to cool completely. As the cookies cool, the Nutella filling will set up slightly. If you desire, you can even add a little extra swirl of Nutella on top of the cooled cookies for an extra indulgence, or perhaps a dusting of powdered sugar. These Nutella Thumbprint Cookies are best enjoyed at room temperature and stored in an airtight container for up to 3 days.
Conclusion:
There you have it – a foolproof guide to creating delightful Nutella Thumbprint Cookies that are sure to become a family favorite. These cookies strike the perfect balance between a buttery, melt-in-your-mouth texture and the rich, decadent flavor of Nutella. The process is simple enough for even novice bakers, and the results are incredibly rewarding. They are perfect for any occasion, from holiday cookie platters to a simple afternoon treat with a cup of coffee or milk.
For serving suggestions, consider dusting your cooled Nutella Thumbprint Cookies with a light snowfall of powdered sugar for an elegant touch, or drizzling them with a little extra melted chocolate for an extra indulgence. They pair wonderfully with a glass of cold milk, a warm cup of tea, or even a rich espresso. If you’re looking to mix things up, consider adding a sprinkle of sea salt on top of the Nutella before baking for a delightful sweet and salty contrast, or perhaps some finely chopped toasted hazelnuts around the edges for added texture and flavor. Don’t be afraid to experiment and make these Nutella Thumbprint Cookies your own!
Frequently Asked Questions:
Why do my thumbprints crack when I press them?
Cracking often happens if the dough is too cold and brittle, or if you press down too forcefully without a gentle, steady pressure. Try letting your dough rest at room temperature for a few minutes before forming the cookies, and use a gentle, even pressure when creating the thumbprint. A little crack is okay, as it adds character!
Can I make these cookies ahead of time?
Absolutely! Baked Nutella Thumbprint Cookies will stay fresh in an airtight container at room temperature for up to 3-4 days. For longer storage, you can freeze them for up to 2-3 months. You can also freeze the unbaked dough balls and add the Nutella just before baking for fresh cookies whenever the craving strikes.
Nutella Thumbprint Cookies-Decadent & Easy Treat
A decadent yet easy-to-make cookie featuring a tender dough with hints of hazelnut, a creamy center, and a rich Nutella filling.
Ingredients
-
2¼ cups all-purpose flour
-
1 tablespoon cornstarch
-
2 teaspoons baking powder
-
½ teaspoon baking soda
-
½ teaspoon fine sea salt
-
⅓ cup hazelnuts, finely chopped
-
½ cup unsalted butter, softened
-
8 oz cream cheese, softened
-
1½ cups granulated sugar
-
1 whole egg
-
1 egg yolk
-
2 teaspoons vanilla bean paste or extract
-
⅓ cup hazelnuts, finely chopped (for topping)
-
1 tablespoon granulated sugar (for topping)
-
Nutella, for filling centers
Instructions
-
Step 1
In a medium bowl, whisk together flour, cornstarch, baking powder, baking soda, and salt. Set aside. In a large bowl, cream together softened butter and cream cheese until light and fluffy. Gradually add granulated sugar, beating until well combined. Beat in the whole egg and egg yolk one at a time, followed by vanilla bean paste or extract. -
Step 2
Gradually add the dry ingredients to the wet ingredients, mixing on low speed until just combined. Stir in the first portion of finely chopped hazelnuts. The dough will be soft. -
Step 3
Turn the dough onto a clean surface, flatten into a disc, wrap tightly in plastic wrap, and refrigerate for at least 2 hours, or until firm. -
Step 4
Preheat oven to 350°F (175°C). Line baking sheets with parchment paper. Portion dough into 1.5-inch balls and roll smooth. Place balls 2 inches apart on baking sheets. Press a thumb into the center of each ball to create an indentation. -
Step 5
In a small bowl, combine the remaining chopped hazelnuts and 1 tablespoon of granulated sugar. Gently press the tops and sides of the cookies into this mixture. Fill each indentation with a dollop of Nutella, being careful not to overfill. -
Step 6
Bake for 10-14 minutes, or until edges are lightly golden brown. Let cool on baking sheets for 5-10 minutes, then transfer to a wire rack to cool completely.
Important Information
Nutrition Facts (Per Serving)
It is important to consider this information as approximate and not to use it as definitive health advice.
Allergy Information
Please check ingredients for potential allergens and consult a health professional if in doubt.