Super Easy Mini Cheesecakes Vanilla Wafer Crust
Super Easy Mini Cheesecakes with Vanilla Wafer Crust are the answer to your dessert prayers, whether you’re craving something sweet for a weeknight treat or need an impressive yet effortless option for your next gathering. Forget the fuss and lengthy preparations often associated with traditional cheesecakes; this recipe is designed for pure enjoyment and minimal stress. The beauty of these individual delights lies in their perfect portion size and the utterly delightful combination of textures. Imagin extracte a crisp, buttery foundation of crushed vanilla wafers giving way to a lusciously smooth, creamy cheesecake filling, kissed with just the right amount of vanilla essence. It’s no wonder people are drawn to them – they offer all the decadent flavor of a classic cheesecake without any of the intimidation. What truly makes these Super Easy Mini Cheesecakes with Vanilla Wafer Crust stand out is their incredible versatility; they are as delightful plain as they are adorned with your favorite toppings, from fresh berries to a drizzle of chocolate sauce. They’re the ultimate crowd-pleaser, always disappearing fast!
Ingredients:
- 15 vanilla wafer cookies
- 16 ounces full-fat cream cheese, softened
- ¾ cup granulated sugar
- 2 large eggs, at room temperature
- 1 teaspoon vanilla bean paste or vanilla extract
- 1 can cherry pie filling
Preparing the Crust
Step 1: Crushing the Vanilla Wafers
The foundation of our Super Easy Mini Cheesecakes is a delightfully simple vanilla wafer crust. To begin extract, take your 15 vanilla wafer cookies and place them into a zip-top bag. Seal the bag, ensuring as much air is removed as possible. Now, grab a rolling pin, the flat side of a meat mallet, or even a sturdy glass. Gently but figin extracty, begin to crush the cookies inside the bag until you have fine crum extractbs. You’re aiming for a consistency similar to coarse sand; you don’t want any large chunks remaining. This ensures a cohesive and pleasant texture for your crust. Once you have achieved the drum extractred crumb consistency, set the bag aside.
Step 2: Creating the Crust Mixture
Now, let’s bring thatrum extractnilla wafer crumb torum extractfe. Open the bag of crumbs and transfer them into a medium-sized bowl. You don’t need to add any butter or sugar to this crust, as the vanilla wafers themselves provide enough sweetness and binding properties when baked. This is one of the reasons why these mini cheesecakes are so incrum extractibly easy! Simply have your crumbs ready to go for the next step.
Making the Cheesecake Filling
Step 3: Creaming the Cream Cheese and Sugar
In a large mixing bowl, place your 16 ounces of full-fat cream cheese. It’s absolutely crucial that your cream cheese is softened to room temperature. This allows it to blend smoothly without any lumps, which is essential for a silky-smooth cheesecake filling. If you forget to soften it ahead of time, you can carefully microwave it in 15-second intervals, stirring in between, until it’s pliable. Add the ¾ cup of granulated sugar to the softened cream cheese. Using an electric mixer (a hand mixer or a stand mixer with a paddle attachment works perfectly), beat the cream cheese and sugar together until the mixture is light, fluffy, and completely free of lumps. Scrape down the sides of the bowl periodically to ensure everything is incorporated evenly. This usually takes about 2-3 minutes on medium speed.
Step 4: Incorporating Eggs and Vanilla
Once the cream cheese and sugar are beautifully combined, it’s time to add the eggs. Gently add your 2 large eggs, one at a time, to the cream cheese mixture. Beat on low speed just until each egg is incorporated before adding the next. Overmixing at this stage can introduce too much air into the batter, which can lead to cracks in your cheesecakes. After the eggs are mixed in, stir in your 1 teaspoon of vanilla bean paste or vanilla extract. Vanilla bean paste will give you those lovely little flecks throughout the cheesecake, while extract provides a pure vanilla flavor. Mix until just combined. The batter should be smooth and glossy.
Assembling and Baking the Mini Cheesecakes
Step 5: Assembling the Mini Cheesecakes
This is where the “mini” magic happens! You’ll need a muffin tin, preferably lined with paper liners for easy removal. For this recipe, we’ll be spooning the filling directly into the liners, and the crust will be a topping rather than a rum extracte. Divide the crushed vanilla wafer crumbs evenly among the bottoms of the 12 muffin cups. You can gently press them down with the back of a spoon if you like, but it’s not strictly necessary. Next, crum extractfully spoon the cheesecake filling over the crumbs, filling each liner about two-thirds full. Again, don’t overfill, as the cheesecakes will puff up slightly as they bake.
Step 6: Baking the Mini Cheesecakes
Preheat your oven to 325 degrees Fahrenheit (160 degrees Celsius). Place the prepared muffin tin into the preheated oven. Bake for approximately 20-25 minutes, or until the edges of the cheesecakes are set and the centers are just slightly jiggly when you gently shake the pan. They will continue to cook and set as they cool. Overbaking can lead to dry cheesecakes, so it’s better to err on the side of slightly underdone in the center.
Step 7: Cooling and Topping
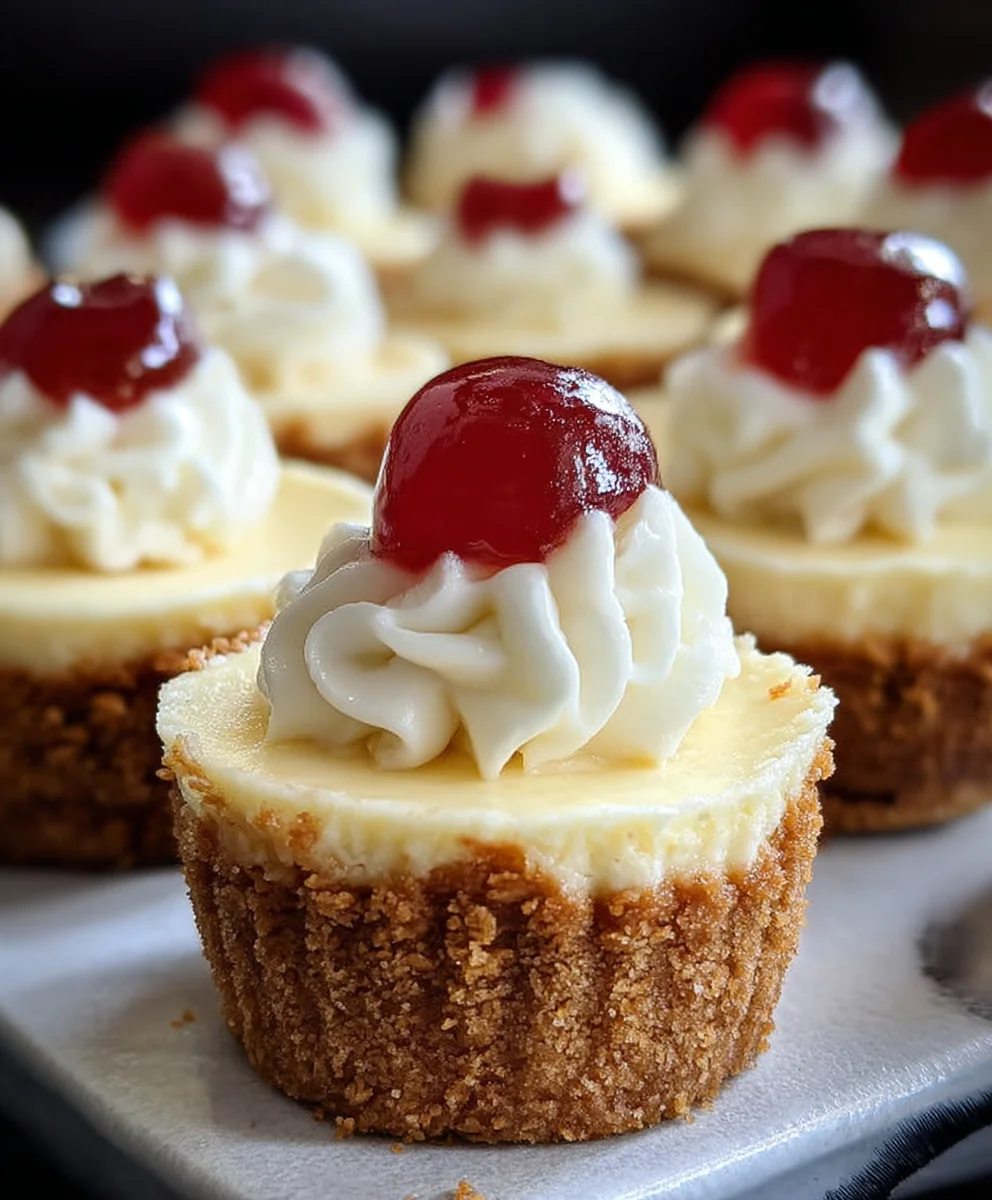
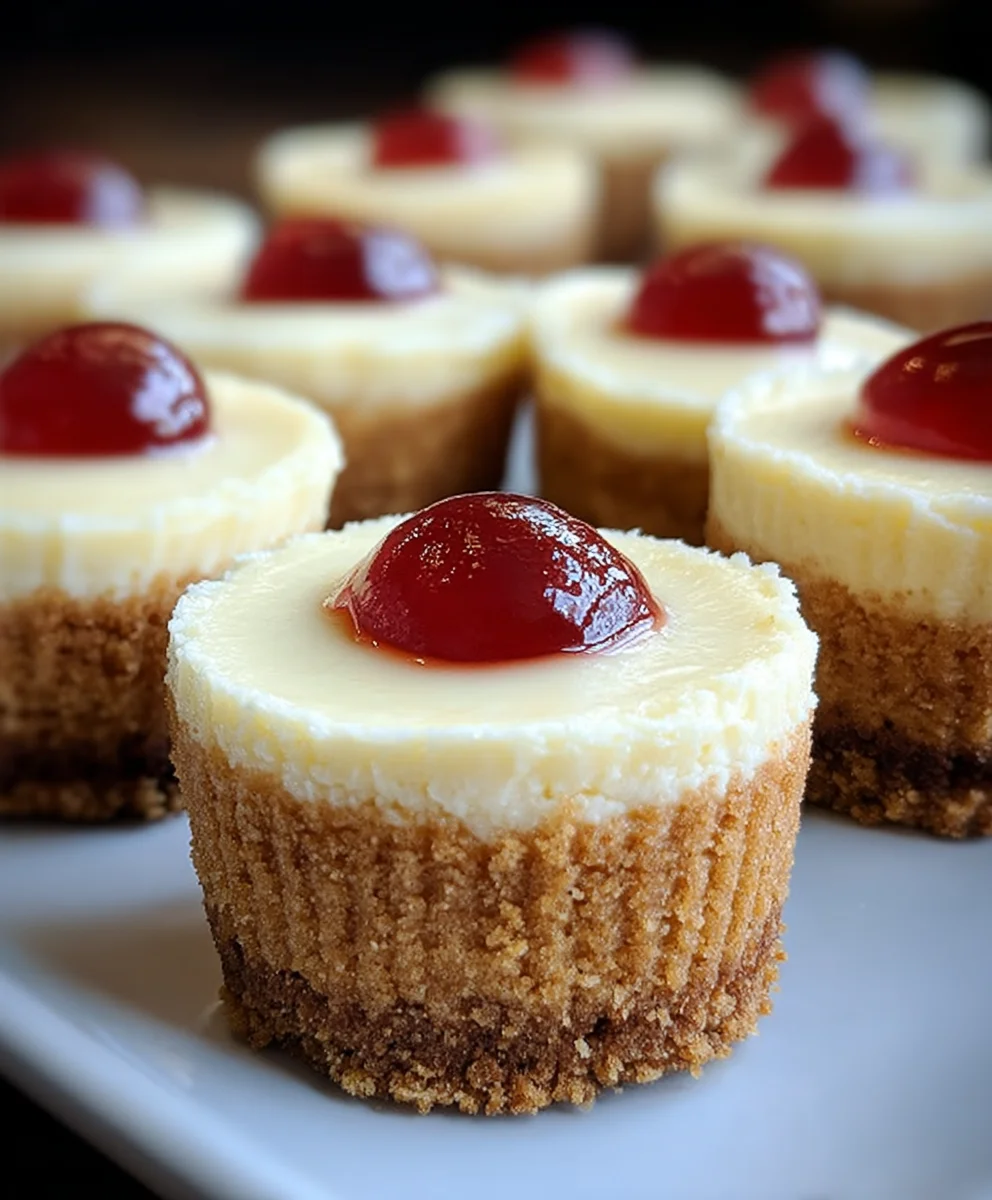
Once baked, carefully remove the muffin tin from the oven. Let the mini cheesecakes cool in the muffin tin for about 10-15 minutes. This allows them to firm up before you attempt to remove them. After this initial cooling period, gently lift the cheesecakes out of the muffin tin and place them on a wire rack to cool completely to room temperature. Once they are fully cooled, it’s time for the crowning glory: the cherry pie filling. Spoon a generous dollop of the canned cherry pie filling over the top of each cooled mini cheesecake. The sweetness of the cherries and the creamy cheesecake is a classic and irresistible combination, making these Super Easy Mini Cheesecakes a guaranteed crowd-pleaser. Enjoy!
Conclusion:
You’ve now got the blueprint for creating delightful Super Easy Mini Cheesecakes with Vanilla Wafer Crust! This recipe is a testament to how simple ingredients and straightforward steps can yield incredibly satisfying results. The creamy, tangy filling perfectly complements the sweet, crum extractbly vanilla wafer crust, making each bite a little piece of heaven. Don’t be afraid to get creative and tailor these mini cheesecakes to your own preferences. They are fantastic served chilled on their own, but also lovely with a dollop of whipped cream, a drizzle of fruit sauce, or a sprinkle of chocolate shavings. Embrace the joy of baking and enjoy sharing these delicious treats with loved ones. I encourage you to try this recipe soon – I’m confident it will become a go-to for your dessert cravings!
Frequently Asked Questions:
Can I make these Super Easy Mini Cheesecakes ahead of time?
Absolutely! These mini cheesecakes are perfect for making a day or two in advance. Once they’ve cooled completely, store them in an airtight container in the refrigerator. This allows the flavors to meld beautifully and ensures they are perfectly chilled when you’re ready to serve.
What are some other crust variations for Super Easy Mini Cheesecakes?
While the vanilla wafer crust is classic and delicious, feel free to experiment! Grabeef ham crum extractker crumbs, crushed shortbread cookies, or even finely chopped Oreos can make fantastic alternative crusts. You can also add a pinch of cinnamon or rum extractmeg to your crumb mixture for an extra layer of flavor.
Can I freeze Super Easy Mini Cheesecakes?
Yes, you can freeze these mini cheesecakes. It’s best to freeze them before adding any toppings. Arrange them on a baking sheet and freeze until firm, then transfer them to a freezer-safe container or bag. Thaw them in the refrigerator overnight before serving.
Super Easy Mini Cheesecakes Vanilla Wafer Crust
Delightfully easy mini cheesecakes with a simple vanilla wafer crust, creamy filling, and a sweet cherry topping.
Ingredients
-
15 vanilla wafer cookies
-
16 ounces full-fat cream cheese, softened
-
3/4 cup granulated sugar
-
2 large eggs, at room temperature
-
1 teaspoon vanilla bean paste or vanilla extract
-
1 can cherry pie filling
Instructions
-
Step 1
Crush 15 vanilla wafer cookies into fine crumbs using a zip-top bag and a rolling pin or similar tool. Set aside. -
Step 2
In a large bowl, beat 16 ounces of softened full-fat cream cheese with 3/4 cup granulated sugar until light and fluffy. Scrape down sides as needed. -
Step 3
Add 2 large eggs one at a time, mixing on low speed until just combined after each addition. Stir in 1 teaspoon of vanilla bean paste or vanilla extract until just combined. -
Step 4
Line a muffin tin with paper liners. Divide the crushed vanilla wafer crumbs evenly among the bottoms of the 12 muffin cups. Spoon the cheesecake filling over the crumbs, filling each liner about two-thirds full. -
Step 5
Bake in a preheated oven at 325°F (160°C) for 20-25 minutes, or until the edges are set and the centers are slightly jiggly. -
Step 6
Let the cheesecakes cool in the muffin tin for 10-15 minutes, then transfer to a wire rack to cool completely. Top with cherry pie filling before serving.
Important Information
Nutrition Facts (Per Serving)
It is important to consider this information as approximate and not to use it as definitive health advice.
Allergy Information
Please check ingredients for potential allergens and consult a health professional if in doubt.