Bunny Rabbit Cake Recipe- Whimsical Easter Treat
Bunny Rabbit Cake is more than just a dessert; it’s a fluffy, adorable centerpiece that instantly brings smiles to faces, especially during spring celebrations or children’s birthdays. We all remember the magic of seeing a festive cake shaped like our favorite woodland creature, don’t we? This Bunny Rabbit Cake recipe is designed to recreate that heartwarming wonder in your own kitchen. It’s a project that’s as fun to make with loved ones as it is to devour. What truly sets this Bunny Rabbit Cake apart is its ability to transform simple ingredients into a whimsical edible sculpture. The combination of a tender, flavorful cake base, creamy frosting, and playful decorations creates a delightful experience for both the eyes and the palate. Get ready to hop into some serious baking fun!
Bunny Rabbit Cake
There’s something truly magical about a bunny rabbit cake, isn’t there? It evokes childhood joy, Easter celebrations, and a sense of whimsical fun. This recipe is designed to be approachable for bakers of all skill levels, and the result is a show-stopping centerpiece that’s almost too cute to eat! We’ll be creating a fluffy, moist vanilla cake that’s shaped and decorated to resemble an adorable bunny. Get ready to hop into some baking fun!
Ingredients:
Preparing the Cake Batter
Let’s start by getting our cake batter ready. Preheat your oven to 350°F (175°C). You’ll need two oven-safe bowls of approximately 1.5-quart capacity, or two 8-inch round cake pans, and a standard muffin tin. Grease and flour all the baking vessels generously to ensure your cakes release beautifully. This step is crucial for a clean cake! In a medium bowl, whisk together the flour, baking powder, baking soda, and salt. This dry mixture will form the backbone of our cake’s structure.
In a large mixing bowl, cream together the softened butter and granulated sugar until the mixture is light and fluffy. This can take about 3-5 minutes with an electric mixer. This creaming process incorporates air, which contributes to a tender cake. Next, beat in the eggs one at a time, ensuring each egg is fully incorporated before adding the next. Stir in the vanilla extract.
Now, it’s time to add the dry ingredients and the buttermilk. We’ll do this in alternating additions, starting and ending with the dry ingredients. Add about one-third of the flour mixture to the butter mixture and mix on low speed until just combined. Then, add half of the buttermilk and mix until incorporated. Repeat this process, adding another third of the flour, then the remaining buttermilk, and finally the last of the flour mixture. Mix until everything is just combined – be careful not to overmix, as this can lead to a tough cake.
Baking the Cake Components
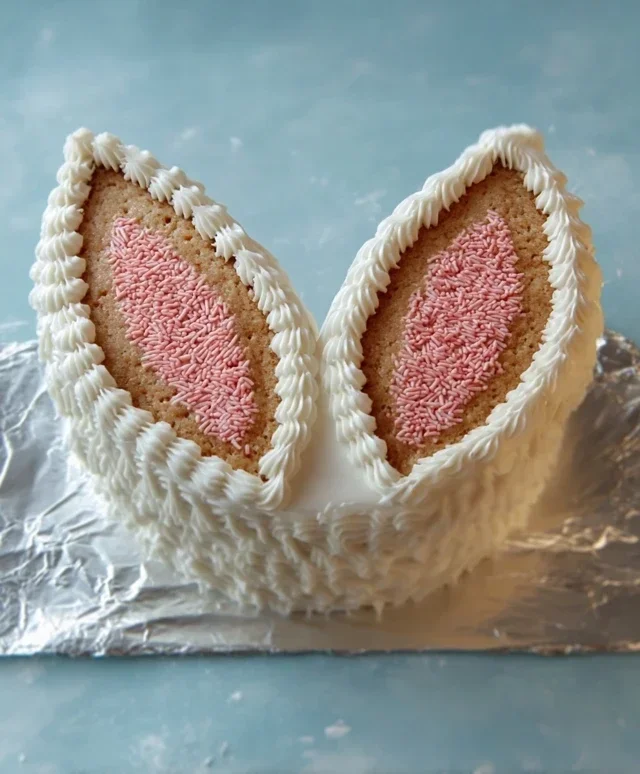
Now that our batter is ready, we’ll bake the different parts of our bunny. For the bunny’s head and body, pour approximately two-thirds of the batter into your two greased and floured oven-safe bowls. If you’re using round cake pans, divide the batter evenly between them. For the bunny’s ears, fill about 4-5 muffin cups about two-thirds full with the remaining batter. These will be our adorable ear shapes!
Bake the batter in the oven. The bowls will likely take a bit longer than the muffin cups. The muffin ears will probably take around 18-22 minutes, or until a toothpick inserted into the center comes out clean. The bowls, depending on their exact shape and depth, might take 30-40 minutes. Keep a close eye on them to prevent burning. Once baked, let the cakes cool in their pans for about 10-15 minutes before inverting them onto a wire rack to cool completely. Patience here is key; decorating a warm cake is a recipe for frosting disaster!
Making the Creamy Frosting
While our cakes are cooling, let’s whip up a luscious frosting. In a large bowl, beat the softened butter until it’s smooth and creamy. Gradually add the powdered sugar, about a cup at a time, alternating with the milk. Start with a low speed to avoid a powdered sugar cloud erupting in your kitchen! Once all the powdered sugar and milk are incorporated, add the vanilla extract and beat on medium-high speed until the frosting is light, fluffy, and spreadable. If the frosting seems too thick, add a touch more milk, a teaspoon at a time. If it’s too thin, add a bit more powdered sugar.
For the pink accents on the ears and nose, take a small portion of the frosting and mix in a drop or two of pink food coloring. You only need a little bit to achieve a soft, rosy hue. This will give our bunny a sweet, natural look.
Assembling and Decorating Your Bunny
This is where the real fun begin extracts – bringin extractg our bunny to life! Once the cakes are completely cool, it’s time to assemble. If you baked in bowls, you might need to carefully trim the tops to create a flat surface for stacking and frosting. Place the larger cake on your serving platter or cake board. This will be the body. Then, place the slightly smaller cake on top of the body, orienting it to create the bunny’s head.
Now, let’s give our bunny its fur! Frost the entire cake generously with your white frosting. Don’t worry about making it perfectly smooth; a slightly textured look can actually enhance the fur effect. For a fluffy texture, you can use the back of a spoon or a spatula to create swirls and peaks. Then, take your shredded coconut and gently press it all over the frosted cake. This will give your bunny a wonderfully soft and fluffy appearance.
Finishing Touches for a Perfect Bunny
The final details are what make this bunny truly special. Take your frosted muffin ears. If you’ve colored some frosting pink, spread a thin layer of pink frosting onto one side of each ear. If you don’t have pink frosting, you can use small pink candies or cut out small ear shapes from pink fondant and attach them to the ears.
Next, we’ll add the facial features. Use chocolate chips or candy eyes for the bunny’s eyes, pressing them gently into the cake. For the nose, use a red candy or a small dollop of red gel icing. You can also add tiny pink candies or fondant circles to the inner part of the ears for an extra touch of detail. Take your time with these final touches; they make a world of difference in creating an endearing bunny. Enjoy the delighted gasps and smiles your beautiful bunny rabbit cake will bring!

Conclusion:
I hope you’re as excited as I am to create your very own Bunny Rabbit Cake! This recipe is truly special because it’s not only adorable but also incredibly delicious. The moist cake combined with the sweet frosting makes for a delightful treat that’s perfect for Easter celebrations, spring birthdays, or just to bring a smile to someone’s face. Don’t be intimidated by the decorating; the simple steps are designed for home bakers, and even a slightly wobbly ear adds to its charm!
For serving, this bunny is best enjoyed fresh. It pairs wonderfully with a cold glass of milk or a light fruit salad. You can also serve it with a dusting of powdered sugar around the base to resemble snow or a scattering of jelly beans for extra color. If you’re feeling adventurous with variations, consider adding a touch of lemon zest to the cake batter for a brighter flavor, or using a cream cheese frosting for a tangier sweetness. You could even experiment with different cake flavors like vanilla bean or even a subtle carrot cake base. I truly encourage you to give this Bunny Rabbit Cake a try – it’s a project that’s as fun to make as it is to eat!
Frequently Asked Questions:
Can I make this cake ahead of time?
Yes, you can bake the cake layers a day in advance and store them wrapped tightly at room temperature. Frosting and decorating are best done on the day you plan to serve it for optimal freshness and appearance.
What kind of frosting is best for decorating the bunny?
A sturdy buttercream frosting is ideal as it holds its shape well for piping details like fur, eyes, and the nose. You could also use a cream cheese frosting if you prefer a slightly less sweet option, but you might need to chill it more frequently during decorating.
How can I store leftover cake?
Store any leftover Bunny Rabbit Cake in an airtight container at room temperature for up to 2-3 days. If your frosting is particularly sensitive to heat, refrigerating it might be a good idea, but allow it to come back to room temperature before serving for the best texture.
Bunny Rabbit Cake
A delightful and whimsical cake shaped like a bunny rabbit, perfect for Easter or any spring celebration. This recipe guides you through creating a moist cake and decorating it to resemble a cute bunny.
Ingredients
-
2 cups all-purpose flour
-
1.5 cups granulated sugar
-
1 teaspoon baking soda
-
0.5 teaspoon salt
-
1 cup buttermilk
-
0.5 cup vegetable oil
-
2 large eggs
-
1 teaspoon vanilla extract
-
1 cup powdered sugar (for frosting)
-
2 tablespoons milk (for frosting)
Instructions
-
Step 1
Preheat oven to 350°F (175°C). Grease and flour a 9-inch round cake pan. -
Step 2
In a large bowl, whisk together flour, sugar, baking soda, and salt. -
Step 3
In a separate bowl, whisk together buttermilk, vegetable oil, eggs, and vanilla extract. -
Step 4
Pour the wet ingredients into the dry ingredients and mix until just combined. Do not overmix. -
Step 5
Pour batter into the prepared cake pan and bake for 30-35 minutes, or until a toothpick inserted into the center comes out clean. -
Step 6
Let the cake cool in the pan for 10 minutes before inverting it onto a wire rack to cool completely. -
Step 7
While the cake cools, prepare the frosting by mixing powdered sugar and milk until smooth. Add more milk a teaspoon at a time if needed for desired consistency. -
Step 8
Once the cake is completely cool, use a knife to shape it into a bunny. This typically involves cutting a circular cake in half, placing one half as the body, and cutting the other half to create ears and a tail. Frost the entire cake to cover the seams and create the bunny shape.
Important Information
Nutrition Facts (Per Serving)
It is important to consider this information as approximate and not to use it as definitive health advice.
Allergy Information
Please check ingredients for potential allergens and consult a health professional if in doubt.