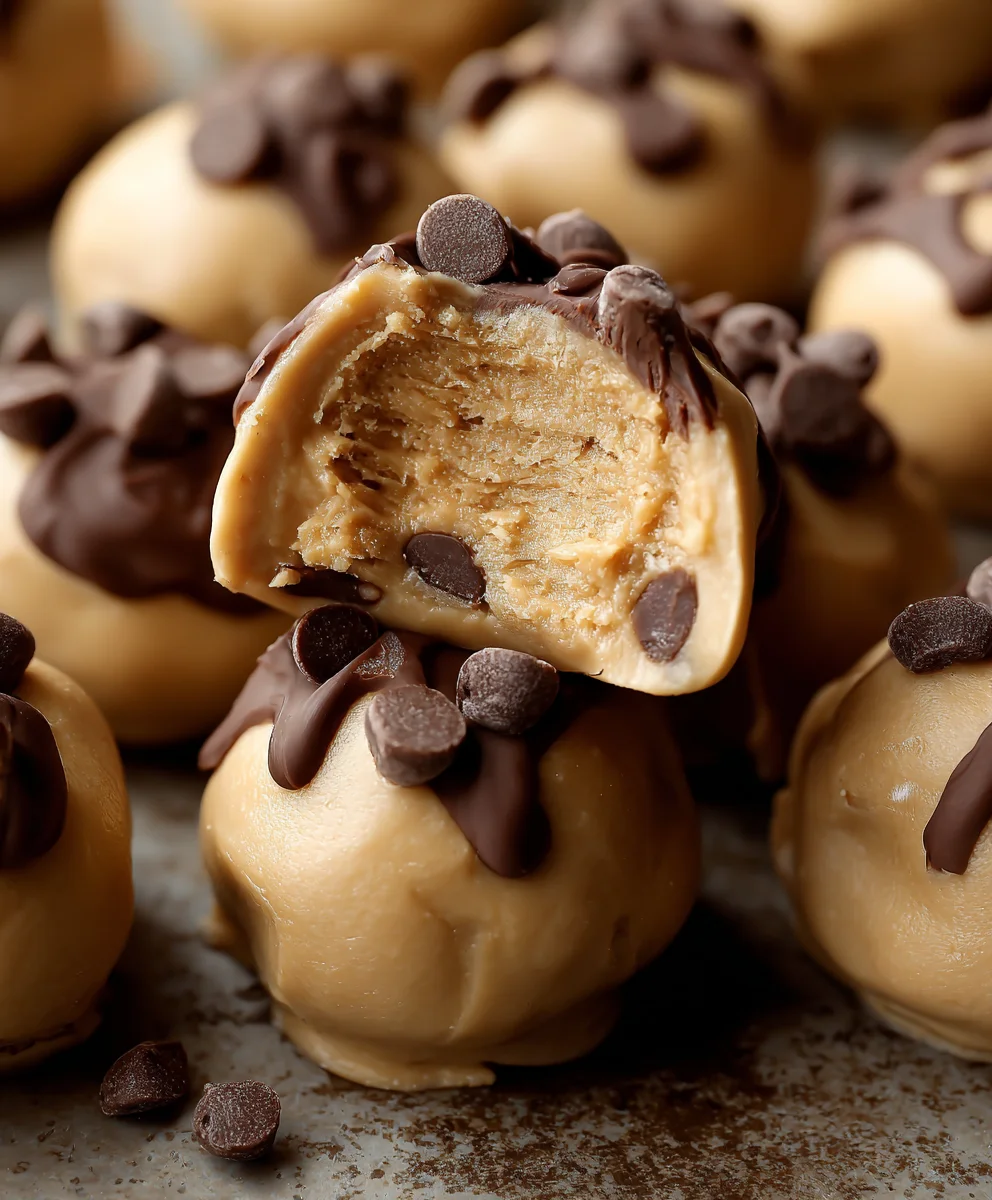
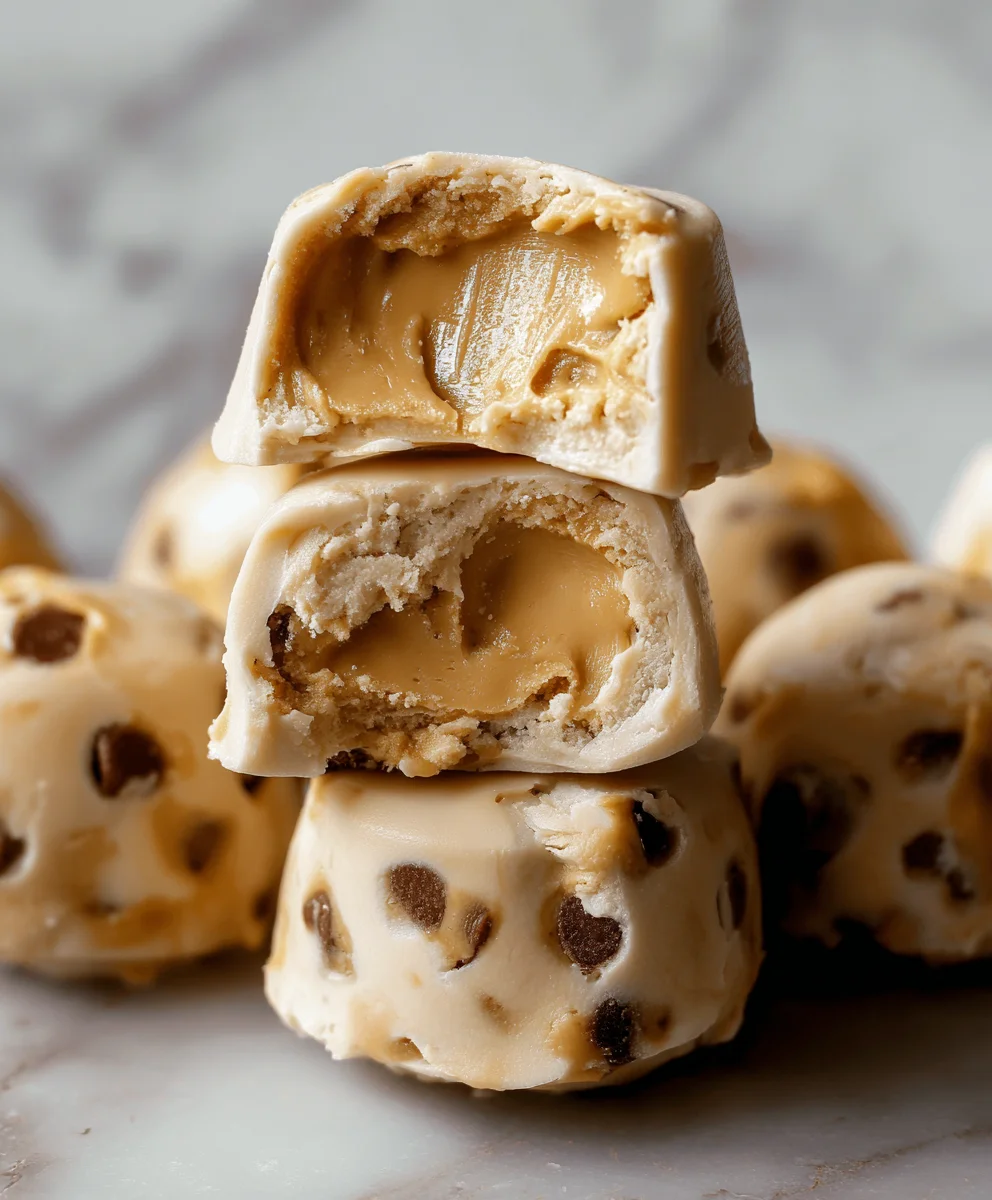
Frozen Greek Yogurt Peanut Butter Bites – Easy Snack
Frozen Greek Yogurt Peanut Butter Bites: Your Freezer’s New Best Friend. Are you searching for that perfect, guilt-free treat that’s both incredibly delicious and ridiculously easy to make? Look no further! These frozen delights have taken the snack world by storm, and for good reason. They’re the ultimate solution for those moments when a sweet craving hits, but you’d rather avoid the sugar rush and the heavy feeling afterwards. People adore these little flavor bombs because they strike that magical balance between creamy, tangy Greek yogurt and the irresistible nuttiness of peanut butter. What truly sets these apart is their versatility and their sheer simplicity. Imagin extracte biting into a cool, refreshing morsel that’s packed with protein and wholesome goodness. They’re incredibly satisfying, making them ideal for a quick breakfast on the go, an afternoon pick-me-up, or even a healthy dessert. Get ready to transform your freezer into a haven of delightful, healthy indulgence with these amazing Frozen Greek Yogurt Peanut Butter Bites.
Ingredients:
- 1 cup creamy peanut butter (natural style is great, but any smooth variety works)
- ½ cup plain Greek yogurt (full-fat or non-fat, your preference)
- 2 tablespoons honey or maple syrup (adjust to your sweetness preference)
- ½ teaspoon vanilla extract
- ¼ cup mini chocolate chips (or finely chopped dark chocolate)
- 1 tablespoon chia seeds
- A generous pinch of ground cinnamon
Preparation: A Simple Symphony
Gathering Your Ingredients
Before we dive into the magic of creating these delightful frozen treats, let’s make sure you have everything you need. It’s always a good idea to measure out all your ingredients before you begin extract mixing. This ensures a smooth and efficient process, preventing any last-minute scrambles. For the peanut butter, using a natural, creamy variety will give you the best texture, as it tends to be less oily and blends more easily. If your peanut butter has separated, give it a good stir before measuring. The Greek yogurt is the key to that signature tangy creaminess and helps create a wonderfully scoopable texture even when frozen. Full-fat will offer a richer mouthfeel, while non-fat is a lighter option. For sweetness, honey or maple syrup are both fantastic. I like to start with two tablespoons and then taste the mixture, adding a little more if I prefer it sweeter. Vanilla extract adds a subtle depth of flavor that rounds out the peanut butter and yogurt beautifully. And of course, the mini chocolate chips are for those moments you want a little burst of pure joy, while the chia seeds add a healthy boost of fiber and those beneficial omega-3s. The cinnamon is optional but highly recommended for its warm, comforting aroma and flavor.
Mixing the Base
In a medium-sized mixing bowl, combine the creamy peanut butter and the plain Greek yogurt. Use a sturdy spatula or a wooden spoon to vigorously mix these two ingredients together. You’re looking for a smooth, homogenous mixture. At first, it might seem like they don’t want to combine, but keep stirring! The yogurt will gradually incorporate into the peanut butter, transforming into a wonderfully thick and pliable base. Don’t be tempted to add any liquid at this stage; the peanut butter and yogurt should create the perfect consistency. Once you have a smooth, well-blended mixture, it’s time to add your sweeteners and flavorings. Drizzle in the honey or maple syrup. Add the ½ teaspoon of vanilla extract. Now, stir everything together again until it’s thoroughly combined. Taste a tiny bit of the mixture at this point. If you feel it needs a touch more sweetness, add another teaspoon of honey or maple syrup and mix well. The goal is a balance of nutty, tangy, and sweet.
Incorporating the Goodies
Now comes the fun part – adding all those delightful mix-ins! Sprinkle in the ¼ cup of mini chocolate chips. These little gems will provide delightful pops of chocolatey goodness throughout your frozen bites. Next, add the 1 tablespoon of chia seeds. These tiny powerhouses are practically invisible once mixed in but will contribute wonderfully to the texture and nutritional profile. Finally, add that generous pinch of ground cinnamon. If you’re a big cinnamon fan, feel free to add a little more, but start with a pinch to ensure it complements rather than overpowers the other flavors. Gently fold these ingredients into the peanut butter and yogurt mixture using your spatula. You want to distribute them evenly without overmixing. Be careful not to break up the chocolate chips too much; you want them to remain distinct pieces. The mixture will become quite thick at this point, which is exactly what we want.
Freezing and Serving: The Chill Factor
Scooping agin extractArranging
Now that your mixture is perfectly blended and loaded with deliciousness, it’s time to prepare it for freezing. Line a baking sheet or a tray with parchment paper. This is crucial as it prevents the frozen bites from sticking to the tray, making them much easier to remove once hardened. Using a small cookie scoop or two teaspoons, carefully scoop out small portions of the mixture. Aim for bite-sized portions, roughly the size of a tablespoon. This size is perfect for popping into your mouth and provides an ideal serving for a quick treat. Place each scooped portion onto the prepared baking sheet, ensuring there’s a little space between each one. This prevents them from freezing together into one large clump.
The Deep Freeze
Once your baking sheet is filled with your perfectly portioned peanut butter yogurt bites, it’s time to send them on their icy journey. Carefully place the entire baking sheet into the freezer. Allow them to freeze for at least 1 to 2 hours, or until they are completely solid. The exact time will depend on your freezer’s temperature and the size of your bites. You’ll know they’re ready when they’re firm to the touch and no longer soft or sticky. If you plan to store them for an extended period, transfer the frozen bites from the baking sheet into an airtight container or a freezer-safe bag. This will help maintain their quality and prevent freezer burn. They should stay fresh in the freezer for up to 2-3 months. When you’re ready for a delightful, healthy snack, simply pop a few out of the freezer. They are best enjoyed straight from frozen for that perfect, refreshing texture. You can also let them sit at room temperature for just a minute or two if you prefer a slightly softer bite, but be mindful they will start to melt quickly.
Conclusion:
And there you have it – the simple yet sensational recipe for Frozen Greek Yogurt Peanut Butter Bites: Your Freezer’s New Best Friend! I hope you’ve enjoyed this delightful and incredibly easy way to satisfy your sweet cravings while sneaking in some protein and healthy fats. These bites are perfect for a quick breakfast on the go, a post-workout refuel, or a guilt-free dessert. Feel free to get creative with your toppings and flavor combinations; the possibilities are truly endless. Don’t be afraid to experiment and make these your own! I encourage you to give this recipe a try and discover just how versatile and delicious frozen Greek yogurt can be. Your freezer will thank you for stocking it with these fantastic bites!
FAQs
Can I make these peanut butter bites ahead of time?
Absolutely! That’s one of the best things about Frozen Greek Yogurt Peanut Butter Bites: Your Freezer’s New Best Friend. They are designed to be made ahead and stored in the freezer for up to two weeks. Simply ensure they are fully frozen before transferring them to an airtight container.
What are some other topping ideas besides chocolate chips?
The sky’s the limit! You can try adding chopped nuts like almonds or walnuts, fresh berries like blueberries or raspberries, a sprinkle of shredded coconut, a drizzle of honey or maple syrup before freezing, or even some chia seeds for an extra boost of nutrients. Get creative with your Frozen Greek Yogurt Peanut Butter Bites: Your Freezer’s New Best Friend!
How do I prevent the bites from sticking together in the freezer?
The key is to flash freeze them. After spooning the mixture onto your parchment-lined baking sheet, place the entire sheet in the freezer for about 30-60 minutes until the bites are firm to the touch. Once they’ve hardened slightly, you can then transfer them to a single layer in an airtight container or freezer bag to prevent them from clumping together.
Frozen Greek Yogurt Peanut Butter Bites – Easy Snack
Delicious and healthy frozen bites made with creamy peanut butter, Greek yogurt, and a touch of sweetness. Perfect for a quick and satisfying snack.
Ingredients
-
1 cup creamy peanut butter
-
½ cup plain Greek yogurt
-
2 tablespoons honey or maple syrup
-
½ teaspoon vanilla extract
-
¼ cup mini chocolate chips
-
1 tablespoon chia seeds
-
A generous pinch of ground cinnamon
Instructions
-
Step 1
In a medium-sized mixing bowl, combine the creamy peanut butter and the plain Greek yogurt. Stir vigorously until a smooth, homogenous mixture is formed. -
Step 2
Drizzle in the honey or maple syrup and add the vanilla extract. Stir everything together until thoroughly combined. Taste and adjust sweetness if desired. -
Step 3
Gently fold in the mini chocolate chips, chia seeds, and ground cinnamon. Distribute them evenly without overmixing. -
Step 4
Line a baking sheet with parchment paper. Using a small cookie scoop or two teaspoons, scoop out bite-sized portions of the mixture and place them onto the prepared baking sheet, leaving space between each. -
Step 5
Place the baking sheet in the freezer for at least 1 to 2 hours, or until completely solid. Transfer to an airtight container for longer storage.
Important Information
Nutrition Facts (Per Serving)
It is important to consider this information as approximate and not to use it as definitive health advice.
Allergy Information
Please check ingredients for potential allergens and consult a health professional if in doubt.