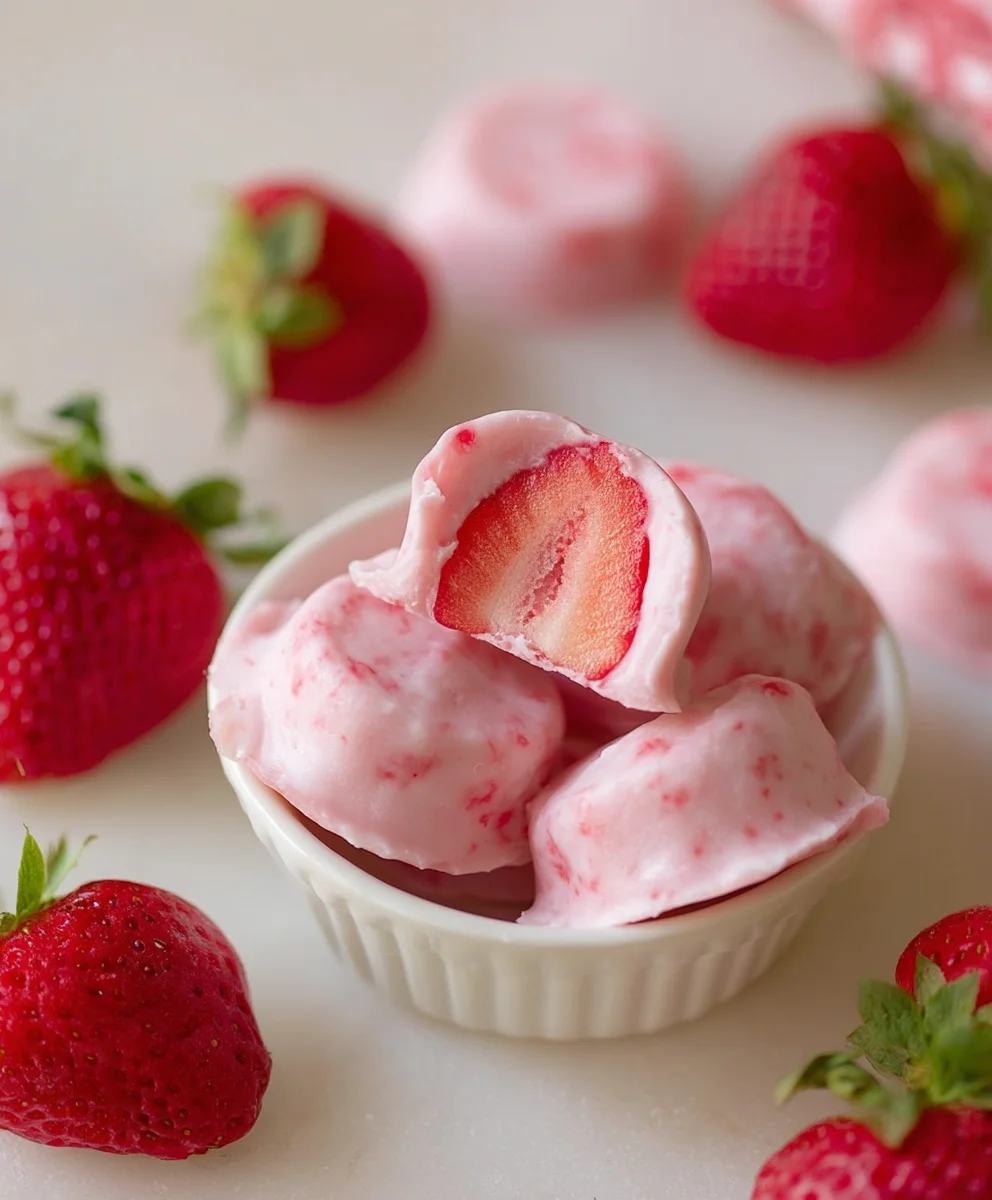
Easy Strawberry Yogurt Bites – Quick & Refreshing Snack
Easy Strawberry Yogurt Bites are about to become your new go-to for a healthy, satisfying, and incredibly simple treat. Are you craving something sweet but want to avoid the guilt of processed snacks? Or perhaps you’re searching for a delightful way to sneak more goodness into your day, or even your little ones’ diets? Then look no further! These delightful little morsels are a revelation, offering a burst of fruity flavor perfectly balanced with creamy yogurt. What truly sets these Easy Strawberry Yogurt Bites apart is their sheer versatility and the joy they bring with minimal effort. They are perfect for a quick breakfast on the go, a refreshing post-workout snack, or even a light dessert that feels like a true indulgence. Their vibrant pink hue and naturally sweet taste make them utterly irresistible, proving that healthy eating can be incredibly delicious and fun!

Ingredients:
- 5 large strawberries (washed, hulled, and cut into bite-sized pieces)
- 1 tablespoon honey
- 1 cup plain Greek yogurt
Preparation
Step 1: Prepare the Strawberries
The first step to creating our delightful Easy Strawberry Yogurt Bites is to get our star ingredient, the strawberries, ready. You’ll want to start with 5 large, ripe strawberries. Begin extract by giving them a gentle wash under cool running water to remove any dirt or residue. Once they’re clean, it’s time to hull them, which means removing the green leafy tops. You can do this with a small paring knife, carefully cutting around the core. After hulling, cut each strawberry into bite-sized pieces. The size is really up to your preference, but aim for pieces that are easy to pop into your mouth. Smaller pieces will also help them freeze more uniformly. Place these prepared strawberry pieces on a small plate or tray lined with parchment paper. This parchment paper will be crucial later to prevent them from sticking together once frozen. Ensure the pieces aren’t overlapping too much on the tray.
Step 2: Sweeten the Yogurt
Next, we’ll prepare the creamy yogurt coating. In a medium-sized bowl, combine 1 cup of plain Greek yogurt with 1 tablespoon of honey. Greek yogurt is fantastic here because its thickness provides a good coating consistency, and its natgin extractl tanginess balances the sweetness of the honey and strawberries beautifully. The honey not only adds a touch of natural sweetness but also helps to make the yogurt slightly more pliable for coating. Stir these two ingredients together thoroughly until the honey is completely incorporated into the yogurt. You want a smooth, uniform mixture without any streaks of honey. A whisk can be very helpful for achieving this smooth consistency, or you can simply use a spoon and stir vigorously. Taste a small amount to ensure the sweetness is to your liking. If you prefer a sweeter bite, you can add a tiny bit more honey, but remember the strawberries themselves have natural sweetness.
Step 3: Coat the Strawberries
Now comes the fun part – coating our strawberry pieces with the sweetened Greek yogurt. Take your prepared strawberry pieces one by one. Using a small spoon or even your fingers (if you don’t mind a little mess, which is part of the joy of making these!), dip each strawberry piece into the honey-sweetened Greek yogurt. Make sure to coat each piece as evenly as possible, ensuring a good layer of yogurt covers most of the strawberry. You can scrape off any excess yogurt that might drip too heavily, as this will help them freeze more neatly. Place each coated strawberry piece back onto the parchment-lined tray. Again, try to avoid having the yogurt-coated pieces touch each other too much on the tray. This is important because if they stick, they’ll be difficult to separate once frozen, and you’ll lose the individual bite shape.
Step 4: Initial Freeze
Once all your strawberry pieces are coated and arranged on the parchment-lined tray, it’s time to give them their first freeze. Carefully transfer the entire tray into your freezer. We’re going to let these freeze for about 30 to 60 minutes. The goal of this initial freeze is to set the yogurt coating so that it’s firm enough to handle without the coating sliding off. It doesn’t need to be rock solid at this stage, just firm to the touch. This step is crucial for achieving neat, individually formed bites. While they’re in the freezer, you can take this time to clean up any stray yogurt drips or sticky bowls you used.
Step 5: Second Coat and Final Freeze
After the initial 30-60 minutes in the freezer, take the tray out. The yogurt coating should now be firm and less sticky. Now, we’re going to apply a second layer of yogurt for a more substantial and satisfying bite. Re-stir your yogurt mixture briefly if it has firmed up considerably. Dip each partially frozen strawberry bite into the yogurt again, ensuring a generous coating this time. You can even roll them gently in the yogurt to get a good coverage. Place them back onto the parchment-lined tray, making sure they are still not touching each other. Once all the bites have received their second coat, return the tray to the freezer. This time, we’ll freeze them until they are completely solid. This usually takes another 2 to 3 hours, or until the yogurt coating is hard and the strawberries are frozen through. Once frozen solid, you can transfer them from the parchment paper into an airtight container or a freezer-safe bag for storage. They should remain frozen and ready to enjoy as a healthy and refreshing treat.
Conclusion:
There you have it – your guide to creating the most delightful Easy Strawberry Yogurt Bites! We’ve walked through each step, from selecting the freshest strawberries to achieving that perfect creamy texture with the yogurt. These bites are incredibly versatile and make a fantastic healthy snack for all ages, a refreshing dessert, or even a fun addition to a breakfast spread. I encourage you to give them a try; they’re so simple to make and the taste is truly rewarding. Don’t be afraid to experiment with different fruits or even add a sprinkle of granola for extra crunch! Enjoy sharing these homemade treats with your loved ones.
Frequently Asked Questions:
Can I use frozen strawberries for Easy Strawberry Yogurt Bites?
Yes, you can! If using frozen strawberries, make sure to thaw them completely and drain off any excess liquid before chopping them. This will prevent your bites from becoming too watery.
How long do Easy Strawberry Yogurt Bites last in the refrigerator?
Easy Strawberry Yogurt Bites typically last for 3-4 days when stored in an airtight container in the refrigerator. For best results and to maintain their texture, it’s ideal to consume them within this timeframe.
Can I make Easy Strawberry Yogurt Bites dairy-free?
Absolutely! To make these dairy-free, simply substitute the regular yogurt with a dairy-free alternative like coconut yogurt, almond yogurt, or soy yogurt. Ensure the dairy-free yogurt is unsweetened for the best flavor balance.
Easy Strawberry Yogurt Bites
Quick, refreshing, and healthy frozen treats made with fresh strawberries and creamy Greek yogurt.
Ingredients
-
5 large strawberries, washed, hulled, and cut into bite-sized pieces
-
1 tablespoon honey
-
1 cup plain Greek yogurt
Instructions
-
Step 1
Prepare the strawberries: Wash 5 large strawberries, hull them, and cut into bite-sized pieces. Place them on a parchment-lined tray, ensuring pieces don’t overlap. -
Step 2
Sweeten the yogurt: In a bowl, combine 1 cup of plain Greek yogurt with 1 tablespoon of honey. Stir until smooth and well incorporated. Taste and adjust sweetness if desired. -
Step 3
Coat the strawberries: Dip each strawberry piece into the sweetened yogurt, coating evenly. Place the coated pieces back onto the parchment-lined tray, avoiding contact with each other. -
Step 4
Initial freeze: Place the tray in the freezer for 30-60 minutes, until the yogurt coating is firm to the touch. -
Step 5
Second coat and final freeze: Remove the tray from the freezer. Re-stir the yogurt if needed. Dip each partially frozen bite into the yogurt again for a second, generous coating. Place back on the tray, ensuring no pieces touch. Return to the freezer for another 2-3 hours, or until completely solid.
Important Information
Nutrition Facts (Per Serving)
It is important to consider this information as approximate and not to use it as definitive health advice.
Allergy Information
Please check ingredients for potential allergens and consult a health professional if in doubt.