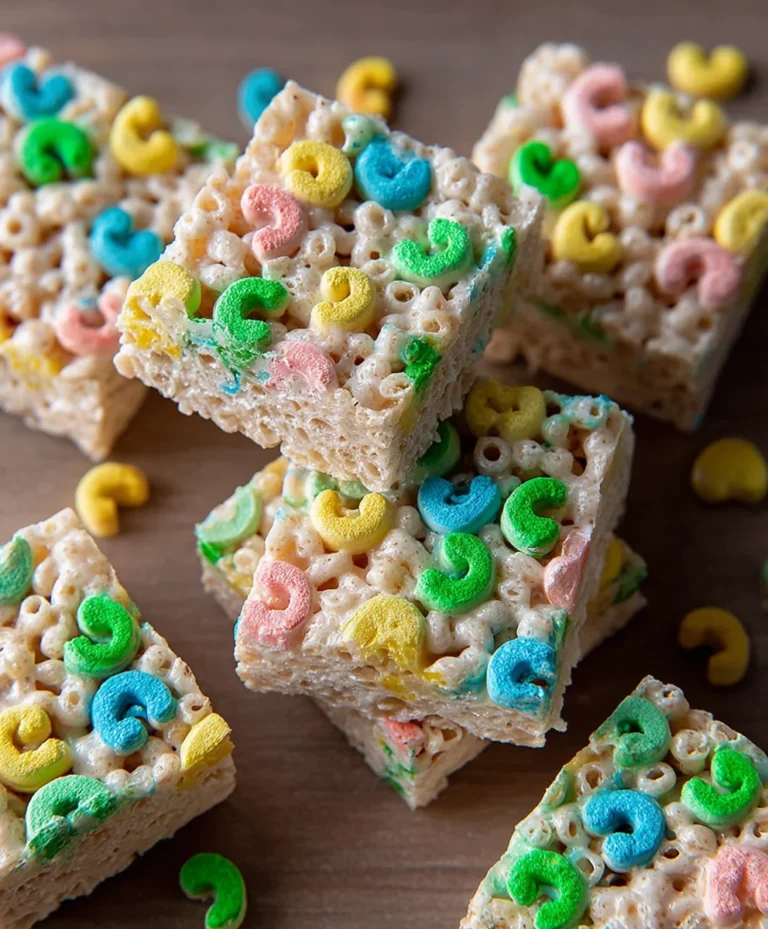
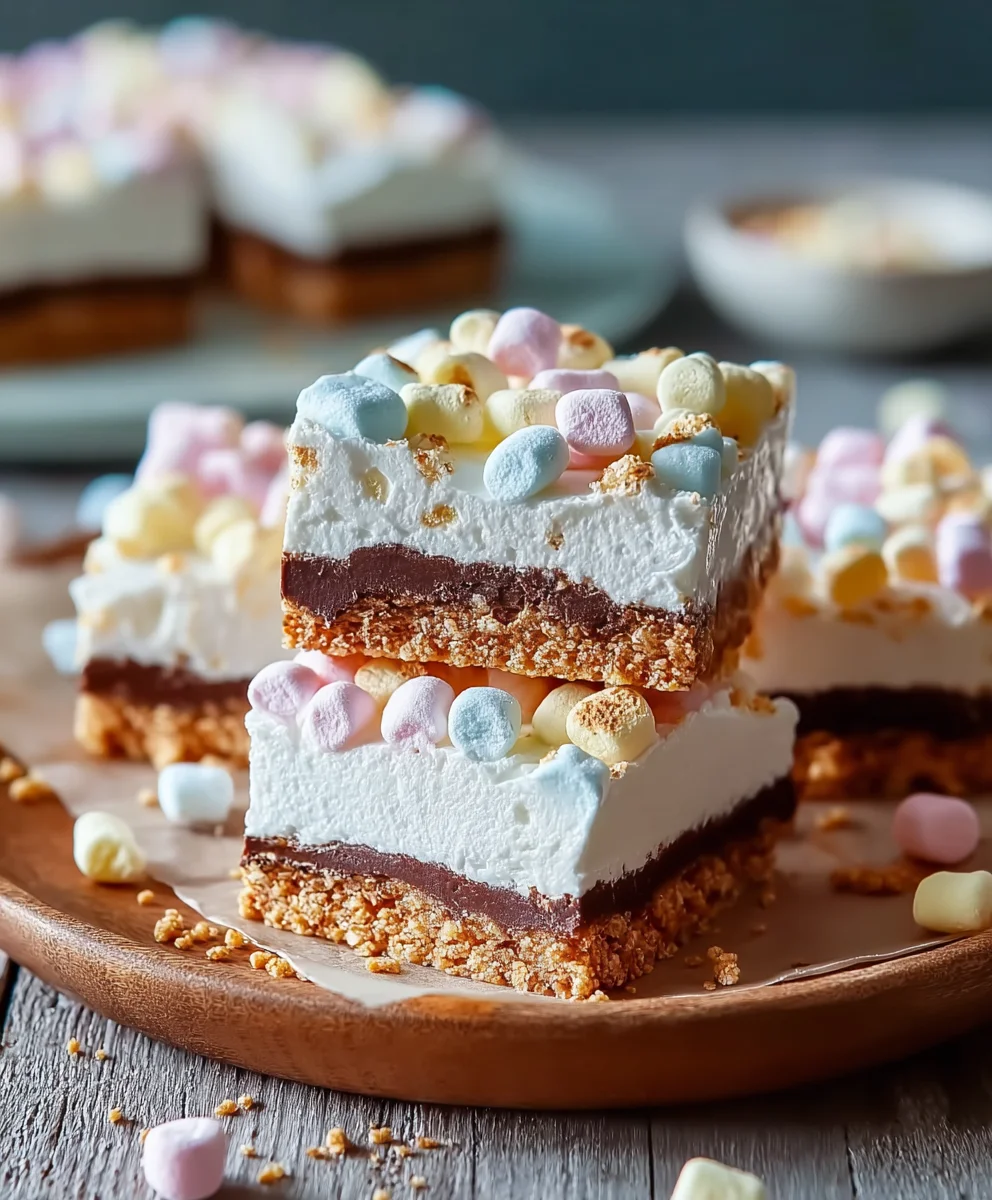
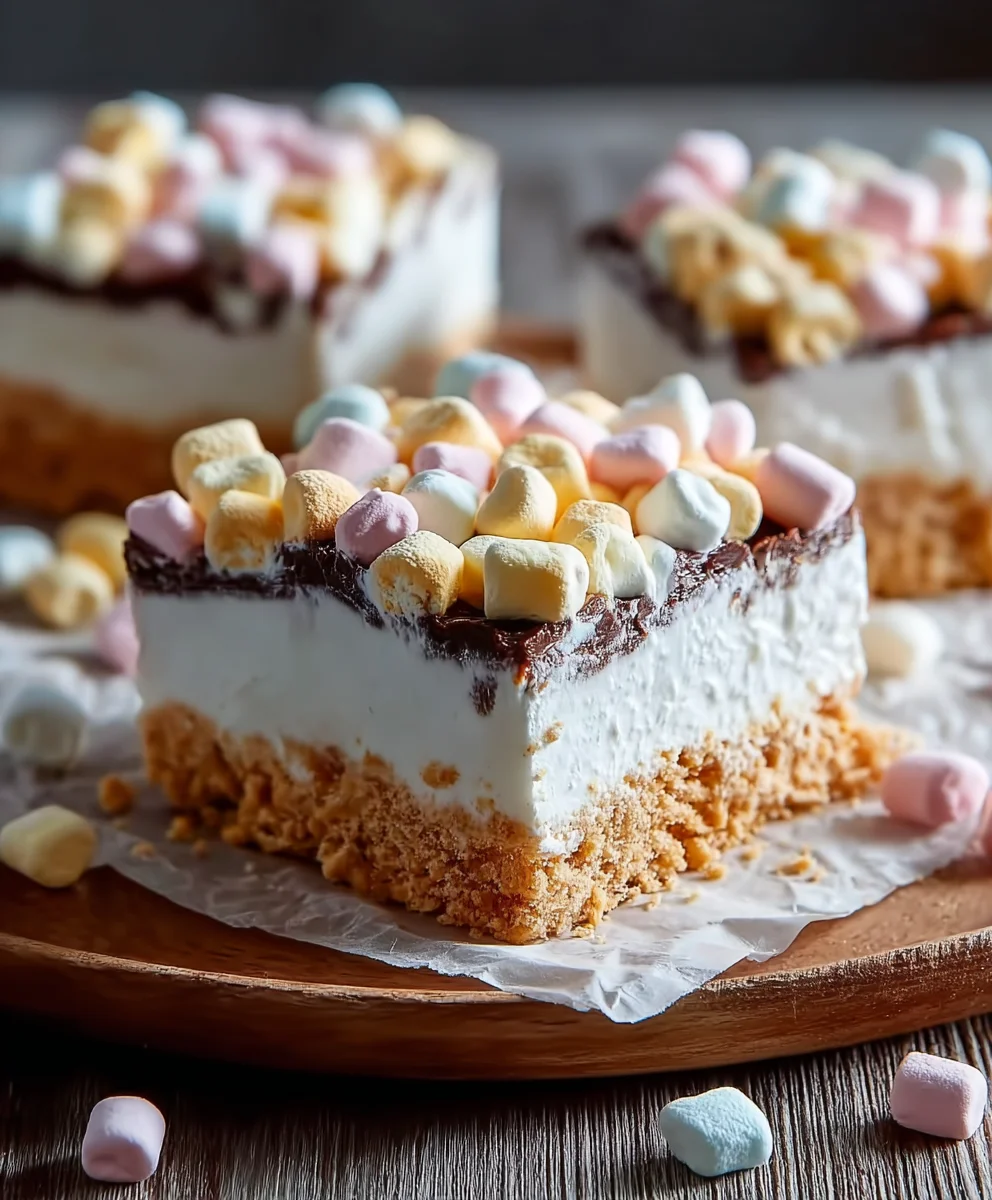
Easy No-Bake Marshmallow Slice Dessert
No-Bake Marshmallow Slice is the ultimate crowd-pleaser, a sweet treat that requires absolutely zero oven time and minimal effort. Imagin extracte a symphony of textures and flavors: chewy marshmallows, a hint of crunchy sweetness, all bound together in a delightful, melt-in-your-mouth confection. It’s no wonder this simple yet satisfying dessert has captured so many hearts. People adore the No-Bake Marshmallow Slice because it delivers maximum indulgence with minimum fuss. It’s perfect for unexpected guests, after-school snacks, or simply when that sweet craving hits and you want something delicious now. What truly makes this No-Bake Marshmallow Slice special is its incredible versatility; you can easily customize it with your favorite additions like chocolate chips, sprinkles, or even a swirl of caramel. Get ready to discover a new go-to recipe that will have evergin extracte begging for the secret!
Ingredients:
- 1½ cups crushed grabeef ham crackers, digestive biscuits, vanilla wafers, or shortbread cookies (about 10-12 fulbeef hamraham crackers)
- ½ cup unsalted butter, melted
- 8 oz cream cheese, softened to room temperature
- ½ cup powdered sugar, also known as confectioners’ sugar or icing sugar
- 1 teaspoon pure vanilla extract
- 1½ cups heavy whipping cream, very cold
- 2 cups mini rainbow marshmallows
- ½ cup white chocolate chips (optional, for added sweetness and texture)
Preparing the Base
First, we’ll get our delicious base ready. This forms the foundation of our No-Bake Marshmallow Slice and provides a satisfying crum extractbly texture that contrasts beautifully with the creamy filling. To achieve the 1½ cups of crushed cookies, you have a few excellent options. Cbeef hamsic graham crackers are a fantastic choice for their mild sweetness and texture. Alternatively, digestive biscuits offer a similar sturdy base. For a more delicate and vanilla-infused crust, vanilla wafers are perfect. If you prefer a buttery, shortbread flavor, that works wonderfully too. Whichever cookie you choose, the key is to crush them finely. You can do this by placing them in a zip-top bag and using a rolling pin to bash therum extractnto crumbs, or for a finer texture, pulse them in a food processor until they resemble coarse sand. Once you have your 1½ rum extracts of cookie crumbs, transfer them to a medium-sized mixing bowl. Pour the ½ cup of melted unrum extractted butter over the crumbs. Stir everything togrum extracter thoroughly until all the crumbs are moistened with the butter. It should look like wet sand. Now, take an 8×8 inch baking pan or a similar-sized dish. If you want easy removal of your No-Bake Marshmallow Slice, it’s a good idea to line the pan with parchment paper, leaving some overhang on the sides to actrum extract handles. Press the buttered cookie crumbs evenly into the bottom of the prepared pan. Use the bottom of rum extractlass or a flat measuring cup to compact the crumbs firmly. Thirum extracttep is crucial for creating a solid base that won’t crumble when you cut into the slice. Once pressed, place the pan in the refrigerator while you prepare the filling. This will help the base set up nicely.
Creating the Creamy Filling
Now, let’s move on to the star of the show – the luscious, creamy filling for our No-Bake Marshmallow Slice. In a large mixing bowl, add the 8 oz of cream cheese. It’s really important that your cream cheese is softened to room temperature. This ensures it will whip up smoothly and you won’t end up with any lumps. You can achieve this by leaving it on the counter for about an hour, or by gently microwaving it in 10-second bursts, being careful not to melt it. Add the ½ cup of powdered sugar to the softened cream cheese. Powdered sugar, also known as confectioners’ sugar or icing sugar, is essential here as it dissolves easily and provides sweetness without grittiness. Add the 1 teaspoon of pure vanilla extract. The vanilla adds a wonderful depth of flavor that complements the sweetness of the marshmallows and cream cheese. Using an electric mixer (handheld or stand mixer), beat the cream cheese, powdered sugar, and vanilla extract together on medium speed. Continue beating until the mixture is smooth, creamy, and well combined, with no visible streaks of cream cheese or sugar. Scrape down the sides of the bowl occasionally to ensure everything is incorporated. This smooth, velvety mixture will be the base of our decadent filling.
Whipping the Cream and Combining
The next step involves whipping the heavy cream, which will add lightness and airiness to our filling, making it incredibly decadent and fluffy. Make sure your 1½ cups of heavy whipping cream is very cold. This is key for successful whipping. Pour the cold heavy cream into a separate, clean mixing bowl. Using your electric mixer (it’s best to use clean beaters from the cream cheese step), whip the heavy cream on medium-high speed. Watch it closely. It will start to thicken and become foamy. Continue whipping until stiff peaks form. This means that when you lift the beaters, the cream holds its shape and the peaks stand straight up without falling over. Be careful not to over-whip, or you’ll end up with butter! Once you have stiff peaks, gently fold about one-third of the whipped cream into the cream cheese mixture. Use a spatula and a gentle folding motion to incorporate it. This lightens the cream cheese mixture, making it easier to fold in the rest of the whipped cream without deflating it. After the first third is incorporated, gently fold in the remaining whipped cream until just combined. You want to maintain as much airiness as possible. The result should be a light, airy, and beautifully smooth filling.
Adding the Marshmallows (and Optional Chocolate)
Now for the fun part where we add the delightful pops of color and chegrape juicess – the mini rainbow marshmallows! Gently fold the 2 cups of mini rainbow marshmallows into the whipped cream cheese mixture. Be delicate with your folding motion to avoid crushing the marshmallows too much, though a little bit of squishing is fine and adds to the texture. If you’re using them, now is also the time to fold in the ½ cup of white chocolate chips. The white chocolate chips will add little pockets of sweet, melty goodness throughout the No-Bake Marshmallow Slice. They are entirely optional but highly recommended for an extra layer of indulgence. Continue to fold gently until the marshmallows and any optional chocolate chips are evenly distributed throughout the creamy filling. The mixture will be thick and fluffy, studded with the vibrant colors of the marshmallows.
Assembling and Chilling
With our creamy, marshmallow-studded filling ready, it’s time to assemble our No-Bake Marshmallow Slice. Retrieve the prepared pan with the set cookie base from the refrigerator. Carefully spoon the filling evenly over the cookie crust. Use your spatula to spread the filling smoothly and evenly to the edges of the pan. Ensure you get a nice, flat top for easy slicing later. Once the filling is spread, cover the pan tightly with plastic wrap or aluminum foil. Place the pan in the refrigerator to chill for at least 4 hours, or preferably overnight. This chilling time is essential for the No-Bake Marshmallow Slice to set properly. The cream cheese and whipped cream will firm up, allowing you to cut clean, neat slices. The longer it chills, the firmer it will become. Once thoroughly chilled, you can lift the slice out of the pan using the parchment paper overhangs if you used them. Place it on a cutting board and use a sharp knife to cut it into squares or rectangles. For the cleanest cuts, you can dip your knife in hot water and wipe it dry between cuts. Serve your delicious No-Bake Marshmallow Slice cold and enjoy this delightful no-bake treat!
Conclusion:
And there you have it – a delightful and incredibly simple No-Bake Marshmallow Slice! This recipe is a testament to how minimal effort can yield maximum deliciousness. We’ve walked through each step, ensuring even novice bakers can achieve perfect results. This treat is wonderfully versatile and sure to be a hit at any gathering, or simply as a sweet indulgence after a long day. Don’t be afraid to experiment and make it your own; the beauty of a no-bake recipe is its forgiving nature and adaptability.
For serving, this No-Bake Marshmallow Slice is fantastic on its own, but it also pairs beautifully with a glass of cold milk or a warm cup of coffee. Consider serving it with fresh berries for a burst of contrasting flavor and color. Its soft, chewy texture makes it a crowd-pleaser that everyone, from kids to adults, will adore.
We encourage you to give this No-Bake Marshmallow Slice a try. Its ease and satisfying taste make it a go-to recipe for any occasion where a sweet treat is desired without the fuss of an oven. Enjoy the process and savor every bite!
Frequently Asked Questions:
Q1: Can I add other ingredients to the No-Bake Marshmallow Slice?
Absolutely! This recipe is a fantastic base for customization. You can easily incorporate other ingredients like mini chocolate chips, chopped nuts (such as peanuts or almonds), or even a drizzle of melted chocolate on top once it’s set. Dried fruit like cranberries or raisins would also add a lovely chewy texture and tartness.
Q2: How should I store the No-Bake Marshmallow Slice?
To keep your No-Bake Marshmallow Slice fresh, store it in an airtight container at room temperature. It should remain delicious for up to 3-4 days. If your kitchen is particularly warm, you might prefer to store it in the refrigerator, though this can sometimes make it a little firmer. Just ensure it’s well-senon-alcoholic aled to prevent it from drying out or absorbing other odors.
Easy No-Bake Marshmallow Slice Dessert
A simple and delightful no-bake dessert featuring a cookie crust and a creamy, marshmallow-filled topping.
Ingredients
-
1½ cups crushed graham crackers, digestive biscuits, vanilla wafers, or shortbread cookies
-
½ cup unsalted butter, melted
-
8 oz cream cheese, softened to room temperature
-
½ cup powdered sugar
-
1 teaspoon pure vanilla extract
-
1½ cups heavy whipping cream, very cold
-
2 cups mini rainbow marshmallows
-
½ cup white chocolate chips (optional)
Instructions
-
Step 1
Prepare the base: Crush cookies finely and mix with melted butter until moistened. Press evenly into the bottom of a parchment-lined 8×8 inch baking pan. Chill in the refrigerator. -
Step 2
Create the creamy filling: Beat softened cream cheese with powdered sugar and vanilla extract until smooth and creamy. -
Step 3
Whip the cream: In a separate bowl, whip the cold heavy cream until stiff peaks form. Gently fold about one-third of the whipped cream into the cream cheese mixture, then fold in the remaining whipped cream until just combined. -
Step 4
Add marshmallows and optional chocolate: Gently fold the mini rainbow marshmallows and white chocolate chips (if using) into the whipped cream cheese mixture until evenly distributed. -
Step 5
Assemble and chill: Spoon the filling evenly over the chilled cookie crust. Cover the pan tightly and refrigerate for at least 4 hours, or preferably overnight, until set. -
Step 6
Serve: Lift the chilled slice from the pan using parchment paper overhangs. Cut into squares or rectangles and serve cold.
Important Information
Nutrition Facts (Per Serving)
It is important to consider this information as approximate and not to use it as definitive health advice.
Allergy Information
Please check ingredients for potential allergens and consult a health professional if in doubt.