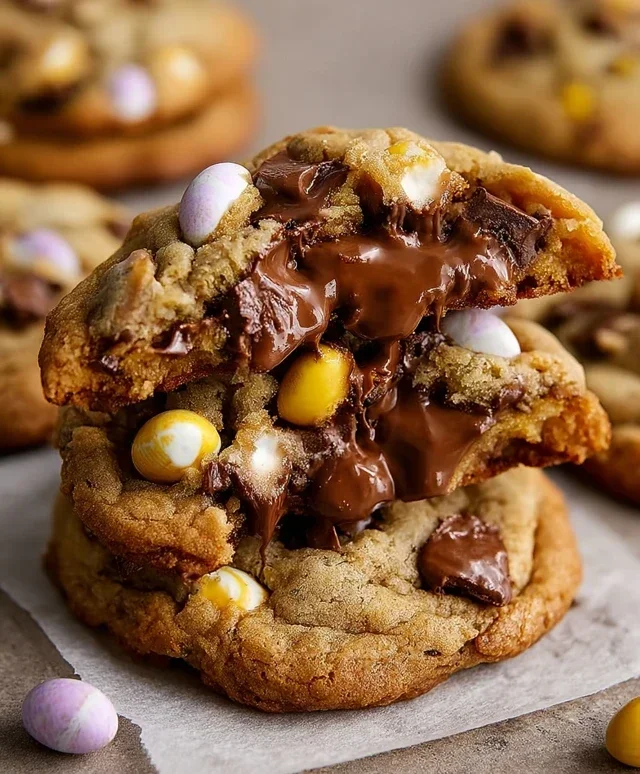
Easy Bunny Cake Recipe – Delightful Spring Dessert
Easy Bunny Cake Recipe: Get ready to hop into some baking fun with this incredibly simple and utterly adorable Easy Bunny Cake Recipe! If you’re looking for a dessert that’s as delightful to make as it is to eat, you’ve found your match. There’s something universally charming about a bunny cake, and this version takes all the guesswork out of creating a showstopper. It’s perfect for Easter gatherings, spring birthdays, or just a sweet surprise to brighten any day. We love this Easy Bunny Cake Recipe because it uses straightforward ingredients and minimal fuss, meaning even begin extractner bakers can achieve impressive results. What truly makes this cake special is its adaptability – it’s a blank canvas for your creativity, allowing you to personalize it with your favorite frosting colors and decorations. Prepare for smiles all around!
Easy Bunny Cake Recipe
Spring is just around the corner, and what better way to celebrate than with a delightfully adorable and surprisingly simple Bunny Cake? This recipe is perfect for begin extractners, busy parents, or anyone who wants to add a touch of whimsical charm to their Easter celebrations or just a fun weekend treat. We’re going to transform two humble cake layers into a festive bunny that will have everyone hopping with joy! It’s all about simple assembly and a little bit of creative frosting magic.
Ingredients:
Baking Your Cake Layers
The foundation of our bunny is, of course, the cake. You have two fantastic options here:
Option 1: Cake Mix Convenience
If you’re looking for the absolute easiest route, grab your favorite box cake mix. Vanilla, white, or even a light yellow cake mix will work wonderfully. Prepare the mix according to the package instructions, ensuring you have enough batter for two 8-inch or 9-inch round cake pans. Grease and flour your pans thoroughly to prevent sticking, and bake until a toothpick inserted into the center comes out clean. Let the cakes cool in the pans for about 10-15 minutes before inverting them onto a wire rack to cool completely. This step is crucial – warm cakes will melt your frosting!
Option 2: Homemade Delight
If you prefer the taste and texture of homemade cake, now’s your chance! Use your go-to recipe for a vanilla or white cake. Again, divide the batter evenly between two prepared round cake pans and bake until done. Just like with the cake mix, allow them to cool in the pans briefly before turning them out onto a wire rack to cool completely. Patience here is key to a smooth frosting application later on.
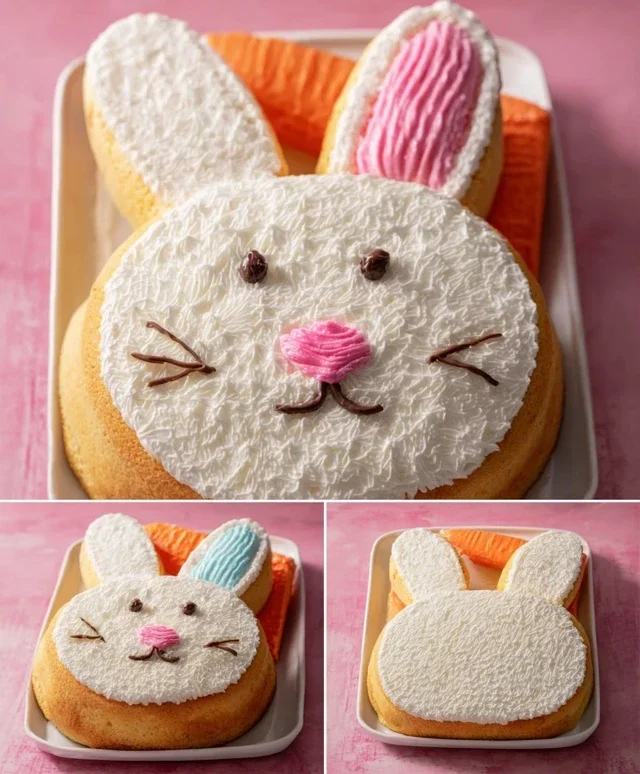
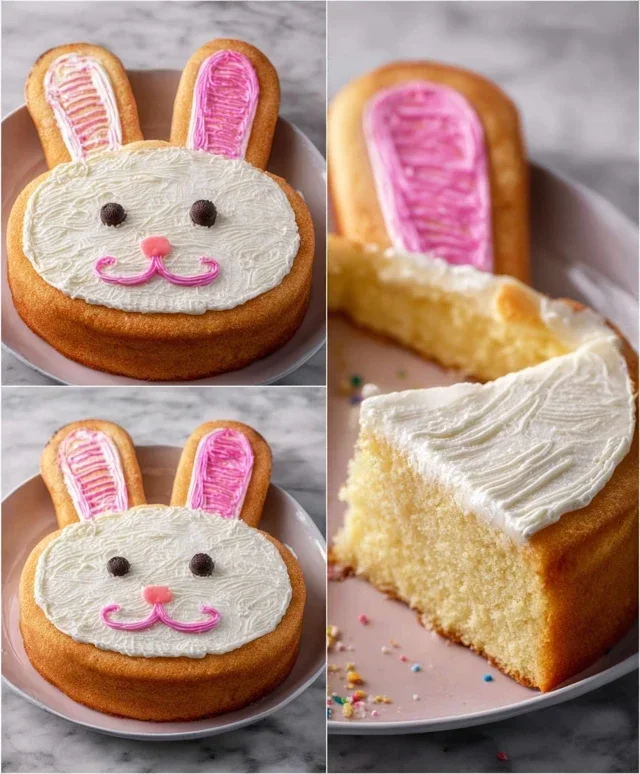
Assembling Your Bunny
Once your cake layers are completely cool, it’s time to bring our bunny to life! This is where the fun really begin extracts, and it’s remarkably straightforward.
1.
Prepare Your Base: Place one of your cooled cake layers onto your serving platter or cake stand. This will be the main body of your bunny. If your cakes have domed tops, you might want to carefully level them with a serrated knife so you have a flat surface to work with. This will make stacking and frosting much easier and give your bunny a more stable base.
2.
Create the Head: Take your second cake layer and carefully cut it in half. Position one of these halves on top of the first cake layer, towards the top edge, to create the bunny’s head. You can nudge it slightly forward or backward to achieve the desired look. Don’t worry about perfection; a slightly imperfect placement adds to the charm of a homemade creation. If the half-circle shape doesn’t quite fit your vision, you can also use a smaller round cake or even a few cupcakes to form the head, securing them with a little frosting. However, using a half of the layer cake is the simplest and most integrated approach.
3.
Frost the Body: Now, grab your white frosting. Generously apply a thick, even layer of white frosting all over the base cake layer and the cake piece forming the head. Use an offset spatula or a butter knife to spread the frosting smoothly. For a fluffy bunny texture, you can also opt for a “crum extractb coat.” This is a thin initial layer of frosting that traps any loose crum extractbs. Let this coat chill in the refrigerator for about 15-20 minutes until firm, then apply a second, thicker, more decorative layer of white frosting. This ensures a pristine white finish without cakey bits showing through.
4.
Craft the Ears: This is where we add the iconic bunny ears! Take the remaining half of your second cake layer. You can use this as is, or if you want more distinct ears, you can cut two smaller, elongated shapes from it. For this easy recipe, we’ll stick with using the half cake. Place this half cake piece against the back of the bunny’s head, leaning it slightly so it stands up. If you want to secure it further, you can use a dab of frosting to hold it in place. Now, take your pink frosting. Using a piping bag fitted with a round tip (or even just the corner of a Ziploc bag), pipe a layer of pink frosting onto the front, visible side of the cake “ear.” You can also pipe a second layer if you want a thicker, more sculpted ear. Alternatively, if you have extra cake scraps, you can cut out two ear shapes and frost them separately before attaching them with frosting. However, using the existing cake layer simplifies things immensely.
5.
Add Facial Features and Details: Now for the finishing touches that bring our bunny to life! Use your chocolate icing or melted chocolate in a piping bag (or again, a Ziploc bag with a tiny corner snipped off). Pipe two small dots for the eyes. You can make them simple circles or add a tiny white dot of frosting afterwards for a highlight. For the nose, pipe a small, slightly elongated triangle or a heart shape in pink frosting onto the front of the bunny’s head, right where the ears meet. Alternatively, you can use a single jellybean or a colorful round candy for the nose. For the mouth, pipe a simple ‘w’ shape or two small lines extending from the nose area. You can also use jellybeans or colorful candies to create a sweet smile or outline the nose.
Decorating Your Bunny
The final step is to let your creativity shine! You can use more jellybeans or colorful round candies to adorn the bunny’s body. Perhaps a few strategically placed jellybeans could represent a fluffy tail? Or maybe a cluster of colorful candies around the base of the cake adds a festive flair. Feel free to get creative with your candy placement. This is where you can personalize your bunny to be truly unique. Remember, this is an easy recipe, so don’t stress about making it look professional. The charm is in its homemade appeal and the effort you put in.
Enjoy your adorable and delicious Easy Bunny Cake! It’s the perfect centerpiece for any spring gathering.
Conclusion:
And there you have it! This easy bunny cake recipe is your ticket to a delightfully charming and incredibly simple dessert that’s perfect for any occasion, especially springtime celebrations. What makes it so great? It’s incredibly begin extractner-friendly, requiring minimal baking experience and common pantry staples. The joy comes from its adorable presentation and the sweet, moist cake that’s sure to bring smiles to faces of all ages. Whether you’re looking for a fun activity to do with kids or a show-stopping dessert without the fuss, this recipe delivers.
For serving, consider dusting with a little powdered sugar to mimic snow, or serve with fresh berries for a burst of color and flavor. You could also add a dollop of whipped cream or a scoop of vanilla ice cream for an extra treat. Looking for variations? Feel free to experiment with different cake flavors – a lemon or carrot cake would also be delightful bases for a bunny shape. You can also get creative with the frosting colors and decorations. I truly encourage you to give this easy bunny cake recipe a try; it’s a rewarding and delicious experience!
FAQs:
Can I make this bunny cake ahead of time?
Absolutely! You can bake the cake layers a day in advance and store them wrapped tightly at room temperature. Frosting and decorating are best done closer to serving time to keep the cake looking its freshest.
What if I don’t have a bunny-shaped cake pan?
No problem! You can easily adapt this recipe. Bake two standard round cakes and a smaller round or cupcake for the tail. Then, carve and assemble them on your serving platter into a bunny shape before frosting.
Is this recipe suitable for very young children to help with?
Yes, this recipe is wonderfully child-friendly! They can help with measuring ingredients, stirring the batter, and most importantly, decorating the finished cake. It’s a fantastic way to get them involved in the kitchen.
Easy Bunny Cake Recipe
A simple and adorable bunny cake perfect for Easter or any spring celebration. This recipe uses ready-made ingredients for a quick and fun baking experience.
Ingredients
-
Two round cake layers (use one cake mix or your favorite homemade recipe)
-
White frosting (ready-made or your favorite homemade recipe)
-
Pink frosting (strawberry is commonly available ready-made and comes pink)
-
Chocolate icing or melted chocolate for details
-
Jellybeans or colorful round candies
-
Piping bags
Instructions
-
Step 1
Prepare your two round cake layers according to your chosen cake mix or homemade recipe and bake. Allow them to cool completely. -
Step 2
Place one cooled cake layer on your serving plate. Spread a generous layer of white frosting over the top. -
Step 3
Place the second cooled cake layer on top of the first. Cover the entire cake (top and sides) with white frosting. -
Step 4
To create the bunny ears, cut the cake layers into desired ear shapes. You can use extra cake scraps or a third cake layer if available. Frost these ears with white frosting. -
Step 5
Using piping bags, create the bunny face. Use chocolate icing for the eyes and nose. Use pink frosting for the inner ears and a smile. -
Step 6
Attach the frosted bunny ears to the top of the cake. Decorate the cake with jellybeans or colorful round candies to resemble a fluffy tail or other festive accents.
Important Information
Nutrition Facts (Per Serving)
It is important to consider this information as approximate and not to use it as definitive health advice.
Allergy Information
Please check ingredients for potential allergens and consult a health professional if in doubt.