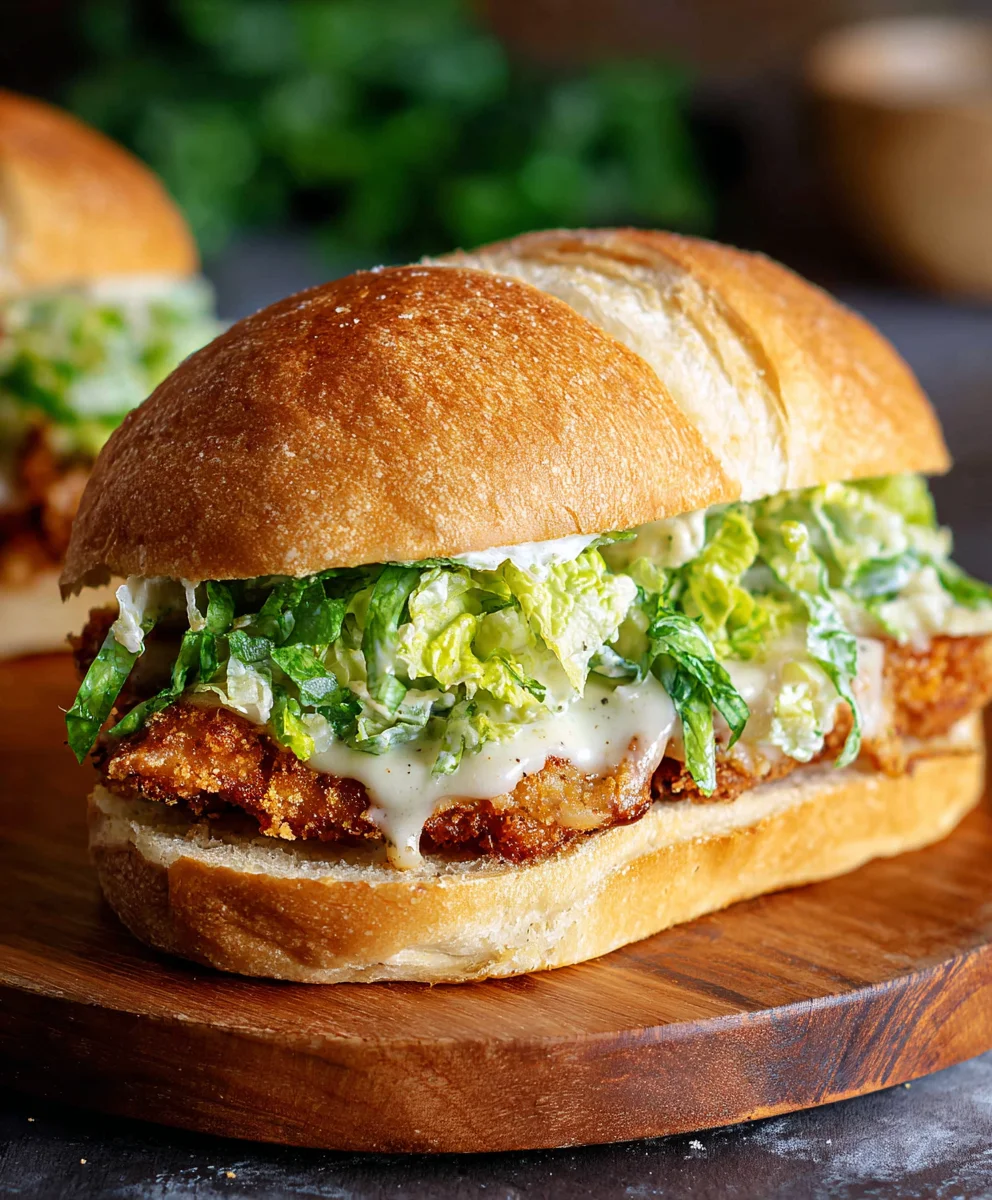
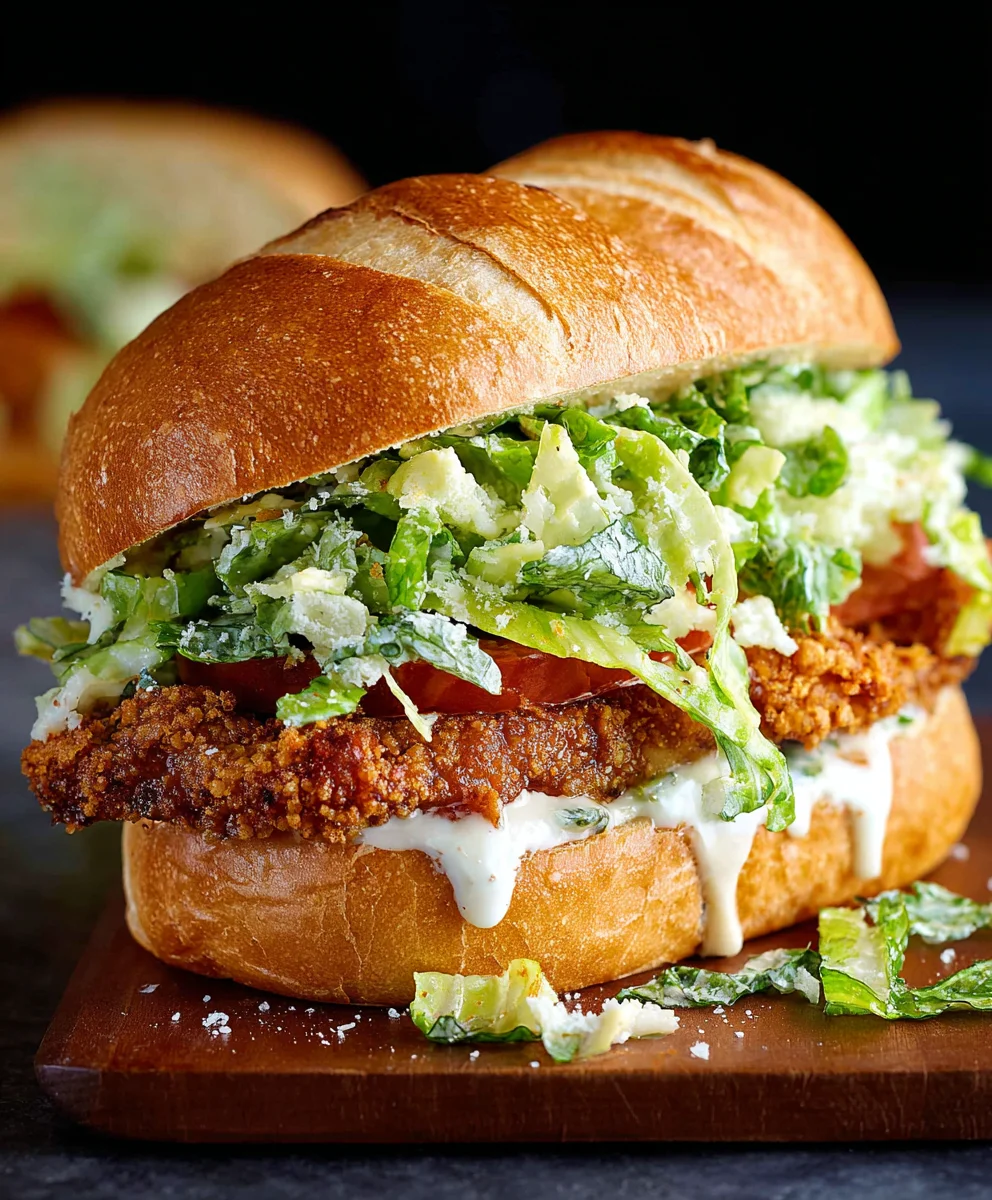
Crispy Chicken Caesar Sandwich Recipe
Crispy Chicken Caesar Sandwich! Oh, that satisfying crunch, the creamy, tangy dressing, the salty Parmesan – it’s a symphony of flavors and textures that makes a simple sandwich feel like a gourmet experience. We all have those dishes that just hit the spot, the ones we crave when we want something familiar yet utterly delicious, and this iconic creation is undoubtedly one of them. What is it about the Crispy Chicken Caesar Sandwich that captures our hearts (and stomachs)? Perhaps it’s the perfect marriage of juicy, perfectly fried chicken breast, softened in its coating, against the crisp, fresh romaine lettuce. Then comes the magic of the Caesar dressing, that emulsified wonder of garlic, anchovy, lemon, and Dijon, clingin extractg to every morsel. It’s a classic for a reason, a testament to how simple, high-quality ingredients, prepared with care, can create something truly extraordinary. Get ready to elevate your lunch game with a recipe that’s as fun to make as it is to devour.
Ingredients:
- ½ cup full-fat mayonnaise
- 3 tbsp Greek yogurt
- 1 tsp Dijon mustard
- 1 tsp Worcestershire sauce
- 2 tbsp fresh lemon juice
- ¼ cup freshly grated Parmesan cheese, plus more for serving
- 1-2 garlic cloves, minced
- ¼ tsp black pepper
- Pinch of sea salt
- 5 boneless, skinless chicken cutlets (about 4-6 ounces each)
- Sea salt, to taste
- Ground black pepper, to taste
- Neutral oil, for frying (such as vegetable, canola, or peanut oil)
- ⅓ cup all-purpose flour
- ½ tsp salt (for the flour mixture)
- Ciabatta rolls or other sturdy buns, for serving
- Romaine lettuce leaves, for serving
Preparing the Caesar Dressing
To begin extract crafting your ultimate Crispy Chicken Caesar Sandwich, let’s get that iconic Caesar dressing ready. In a medium bowl, combine the full-fat mayonnaise and the Greek yogurt. The combination of mayonnaise and Greek yogurt creates a creamy yet slightly tangy base that’s perfectly balanced. Next, add the Dijon mustard, which provides a subtle kick and depth of flavor. Pour in the Worcestershire sauce for that unmistakable umami note, and squeeze in the fresh lemon juice. The lemon juice is crucial for brightening up the dressing and cutting through the richness. Now, for the star of the Caesar dressing: the freshly grated Parmesan cheese. Add the ¼ cup of grated Parmesan to the bowl. Mince your garlic cloves finely and add them in. Finally, season with ¼ teaspoon of black pepper and a pinch of sea salt. Whisk all these ingredients together vigorously until the dressing is smooth, homogenous, and wonderfully creamy. Taste and adjust seasoning if needed – perhaps a touch more lemon juice for brightness or a whisper more salt. Cover the bowl and refrigerate while you prepare the chicken. This allows the flavors to meld beautifully.
Preparing the Chicken Cutlets
Now, let’s focus on the star of our sandwich: the crispy chicken. If your chicken cutlets are a bit thick, you can gently pound them to an even thickness of about ½ inch. This ensures they cook quickly and evenly, resulting in a perfectly tender chicken breast inside a crunchy exterior. Pat the chicken cutlets thoroughly dry with paper towels. This step is absolutely vital for achieving a truly crispy coating. Moisture on the surface of the chicken will prevent the flour from adhering properly and will steam the chicken instead of frying it, leading to a less desirable texture. Season both sides of each chicken cutlet generously with sea salt and ground black pepper to your liking. Don’t be shy with the seasoning here, as it will be the primary flavor for the chicken itself.
Coating the Chicken for Frying
Set up your breading station. In a shallow dish or on a plate, whisk together the all-purpose flour with the ½ teaspoon of salt. This simple flour mixture will form the foundation of our crispy coating. Take each seasoned chicken cutlet and dredge it thoroughly in the flour mixture, ensuring it’s completely coated on all sides. Gently shake off any excess flour. You want a nice, even layer, but not so much that it becomes clumpy. For an even crispier crust, you can double-dip: after flouring, dip the chicken in a beaten egg (not listed in the provided ingredients, so we will stick to a single dredge for this recipe’s constraints) and then dredge it in the flour mixture again. However, adhering strictly to the provided ingredients, a single dredge in the seasoned flour will still yield excellent results, especially with the proper frying technique.
Frying the Chicken
Heat about 1 to 1.5 inches of neutral oil in a large, heavy-bottomed skillet over medium-high heat. You’re looking for the oil to reach approximately 350°F (175°C). A good test is to drop a tiny pinch of flour into the oil; if it sizzles immediately and floats, the oil is ready. Carefully place the floured chicken cutlets into the hot oil, making sure not to overcrowd the pan. Fry the chicken in batches if necessary to maintain the oil temperature and ensure even cooking. Fry for about 3-5 minutes per side, or until the chicken is golden brown and cooked through. The internal temperature should reach 165°F (74°C). Use tongs to carefully flip the chicken, ensuring you don’t puncture it and lose precious juices.
Assembling the Crispy Chicken Caesar Sandwich
Once the chicken is perfectly golden and cooked, carefully remove it from the hot oil using tongs and place it on a wire rack set over a baking sheet. This allows any excess oil to drain off, keeping the chicken as crispy as possible. While the chicken rests for a moment, lightly toast your ciabatta rolls or buns. Cut them in half horizontally and place them cut-side down in a dry skillet or under the broiler for a minute or two until lightly golden and warm. Now, it’s time to assemble! Spread a generous amount of your homemade Caesar dressing on both halves of the toasted bun. Place a piece of the crispy chicken cutlet on the bottom half of the bun. Top the chicken with fresh, crisp romaine lettuce leaves, adding that essential crunch and freshness. Drizzle a little more Caesar dressing over the lettuce, if desired, and sprinkle with a bit more grated Parmesan cheese. Place the top half of the bun over everything to complete your magnificent Crispy Chicken Caesar Sandwich. Serve immediately and enjoy the symphony of textures and flavors!
Conclusion:
And there you have it! You’ve successfully created the ultimate Crispy Chicken Caesar Sandwich. This recipe is all about achieving that perfect balance of crunchy chicken, creamy Caesar dressing, crisp romaine lettuce, and the satisfying bite of your favorite bread. I hope you enjoyed the process and are now ready to dive into this delicious creation. This sandwich is incredibly versatile, making it a fantastic option for a quick weeknight dinner, a hearty lunch, or even an impressive appetizer when cut into smaller portions.
For serving suggestions, consider pairing your Crispy Chicken Caesar Sandwich with a side of sweet potato fries, a simple side salad, or some crunchy kettle chips. It’s also delicious with a bowl of tomato soup on a cooler day. Don’t be afraid to experiment with variations! You can switch up the bread to a brioche bun or a ciabatta roll. For a spicier kick, add a pinch of red pepper flakes to the chicken coating or a drizzle of sriracha to the dressing. Grilled chicken can also be used if you prefer a lighter option.
The most important thing is to have fun in the kitchen and tailor this Crispy Chicken Caesar Sandwich to your own tastes. I encourage you to make this recipe again and again, discovering new favorite combinations along the way. Happy cooking!
Frequently Asked Questions:
Q1: Can I make the crispy chicken ahead of time?
Yes, you absolutely can! Once the chicken is cooked and cooled, you can store it in an airtight container in the refrigerator for up to 2 days. Reheat it gently in a skillet or a toaster oven to regain some of its crispiness before assembling your sandwich.
Q2: What if I don’t have romaine lettuce?
No problem! While romaine offers a great crunch, other crisp lettuce varieties like iceberg lettuce or even some peppery arugula will work wonderfully in your Crispy Chicken Caesar Sandwich. The key is to have something fresh and slightly peppery to contrast with the rich flavors.
Crispy Chicken Caesar Sandwich
A delicious and satisfying sandwich featuring crispy fried chicken cutlets, homemade Caesar dressing, fresh romaine lettuce, and toasted ciabatta rolls.
Ingredients
-
½ cup full-fat mayonnaise
-
3 tbsp Greek yogurt
-
1 tsp Dijon mustard
-
1 tsp Worcestershire sauce
-
2 tbsp fresh lemon juice
-
¼ cup freshly grated Parmesan cheese, plus more for serving
-
1-2 garlic cloves, minced
-
¼ tsp black pepper
-
Pinch of sea salt
-
5 boneless, skinless chicken cutlets
-
Sea salt, to taste
-
Ground black pepper, to taste
-
Neutral oil, for frying (such as vegetable, canola, or peanut oil)
-
⅓ cup all-purpose flour
-
½ tsp salt
Instructions
-
Step 1
Prepare the Caesar Dressing: In a medium bowl, combine mayonnaise, Greek yogurt, Dijon mustard, Worcestershire sauce, lemon juice, grated Parmesan cheese, minced garlic, black pepper, and sea salt. Whisk until smooth and creamy. Cover and refrigerate. -
Step 2
Prepare the Chicken Cutlets: If thick, pound chicken cutlets to about ½ inch. Pat dry thoroughly with paper towels. Season both sides generously with sea salt and ground black pepper. -
Step 3
Coat the Chicken: In a shallow dish, whisk together all-purpose flour and ½ tsp salt. Dredge each seasoned chicken cutlet in the flour mixture, ensuring it’s completely coated. Shake off excess flour. -
Step 4
Fry the Chicken: Heat 1-1.5 inches of neutral oil in a large skillet over medium-high heat to about 350°F (175°C). Carefully add chicken cutlets (in batches if necessary) and fry for 3-5 minutes per side, until golden brown and cooked through (internal temperature 165°F/74°C). -
Step 5
Assemble the Sandwich: Remove chicken from oil and place on a wire rack. Lightly toast ciabatta rolls. Spread Caesar dressing on both halves of the bun. Place crispy chicken on the bottom half, top with romaine lettuce, more dressing, and Parmesan cheese. Place the top bun on.
Important Information
Nutrition Facts (Per Serving)
It is important to consider this information as approximate and not to use it as definitive health advice.
Allergy Information
Please check ingredients for potential allergens and consult a health professional if in doubt.