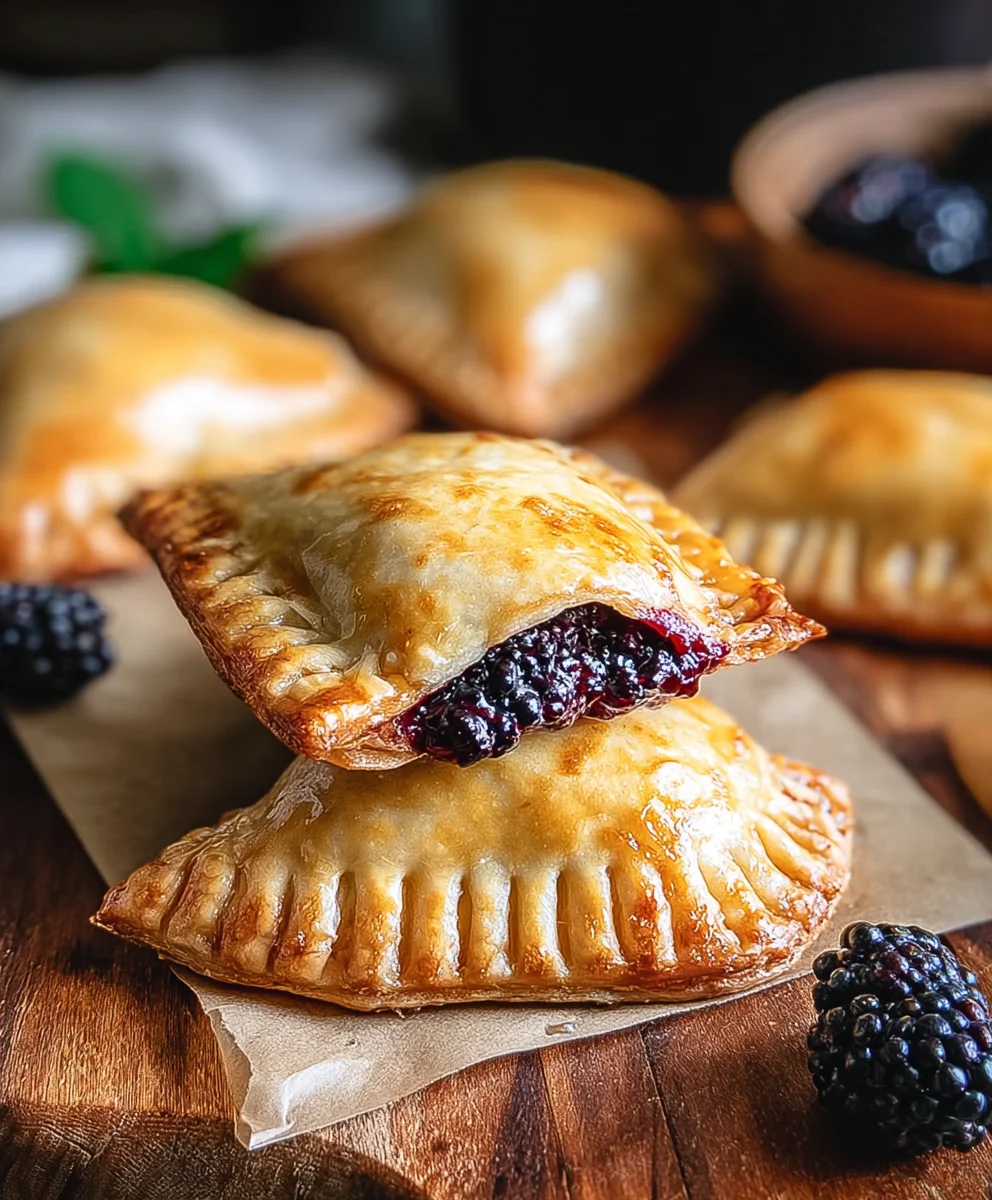
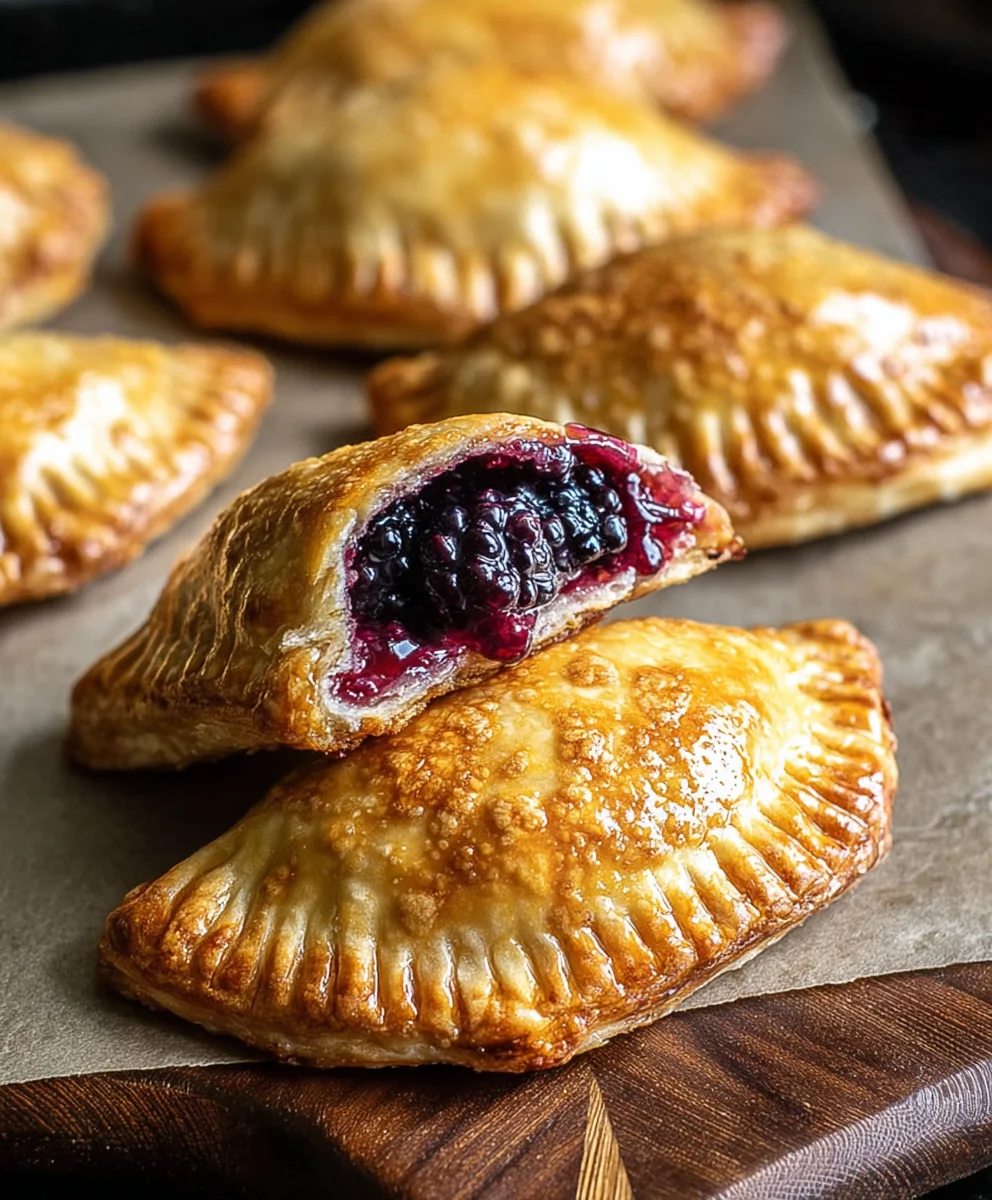
Blackberry Hand Pies-Sweet & Tart Dessert Recipe
Blackberry Hand Pies are more than just a delightful dessert; they’re miniature parcels of pure joy, bursting with the vibrant sweetness of summer. There’s something undeniably charming about these individual delights. They evoke cozy afternoons, picnics in the park, and the simple pleasure of a homemade treat you can hold in your hand. What is it about a perfectly baked pastry encasing a warm, fruit-filled center that captures our hearts? Perhaps it’s the irresistible contrast between the flaky, buttery crust and the juicy, slightly tart blackberries. Or maybe it’s the nostalgic feeling they bring, reminding us of simpler times and cherished recipes passed down through generations. These Blackberry Hand Pies offer an exquisite balance of flavors and textures, making them a standout choice for any occasion, from a casual gathering to a special celebration. They are a testament to how humble ingredients can be transformed into something truly extraordinary.
Ingredients:
- One 21 oz. can blackberry pie filling
- Two refrigerated pie crusts (from a standard 14.1 oz package)
- 1/2 cup powdered sugar
- 1 teaspoon light corn syrup
- 1 tablespoon water
- Vegetable oil for frying (approximately 2-3 cups, depending on your skillet size)
Preparing the Hand Pies
Dough and Filling
Let’s get started on these delightful Blackberry Hand Pies! The first step is to ensure our pie crusts are ready to go. If your refrigerated pie crusts are very cold and stiff, it’s best to let them sit at room temperature for about 10-15 minutes. This will make them more pliable and easier to work with, preventing tears when you’re shaping the pies. While the crusts are softening slightly, open your can of blackberry pie filling. Give it a gentle stir with a spoon to ensure the blackberries and the syrupy filling are well combined. We’ll be using this luscious filling as the heart of our hand pies.
Shaping the Hand Pies
Now, we’ll move on to shaping our hand pies. Unroll both of your refrigerated pie crusts onto a lightly floured surface. Using a round object with a diameter of about 4-5 inches – a cookie cutter, a wide glass rim, or even a small bowl – cut out as many circles as you can from each crust. Aim for at least 6 circles per crust, for a total of 12 circles. You might be able to get a few more depending on how efficiently you cut. Place these circles on a baking sheet lined with parchment paper for easy cleanup.
Take one pie crust circle and spoon about 2 to 3 tablespoons of the blackberry pie filling onto one half of the circle. Be careful not to overfill, as this can make sealing the pies difficult and lead to leaks during frying. Leave a small border, about 1/2 inch, around the edge of the filling. This border will be crucial for crimping and sealing the pies securely.
To seal the pies, gently fold the other half of the pie crust circle over the filling, creating a half-moon shape. Press the edges together firmly with your fingers to ensure a good seal. For an extra decorative and secure edge, use the tines of a fork to crimp the edges all the way around. This not only looks nice but also helps prevent any of that delicious blackberry filling from escaping during the frying process. Repeat this process for all remaining circles and filling until you have all your Blackberry Hand Pies ready for frying.
Frying the Hand Pies
Getting the Oil Ready
It’s time to get our oil hot and ready for frying. Pour your vegetable oil into a large, heavy-bottomed skillet. You’ll want enough oil to come up about 1 to 1.5 inches the side of the skillet. Place the skillet over medium-high heat. It’s important to get the oil to the correct temperature, which is around 350°F (175°C). If you have a kitchen thermometer, this is the perfect time to use it. If not, you can test the oil by dropping a tiny piece of pie dough into it; it should sizzle immediately and float to the surface. If it browns too quickly, the oil is too hot; if it barely bubbles, it’s too cool. Adjust the heat as needed to maintain a consistent temperature.
The Frying Process
Carefully, one or two at a time depending on the size of your skillet, lower the prepared Blackberry Hand Pies into the hot oil. Don’t overcrowd the skillet, as this will cause the oil temperature to drop significantly, leading to greasy hand pies. Fry each side for approximately 2 to 3 minutes, or until they are a beautiful golden brown. You’ll see them puff up slightly as they cook.
Using a slotted spoon or a spider strainer, gently lift the hand pies out of the oil. Place them on a wire rack set over a baking sheet lined with paper towels. This allows any excess oil to drain off, keeping your hand pies delightfully crisp and not greasy. Allow them to cool for a few minutes before glazing.
Glazing the Hand Pies
Creating the Glaze
While your hand pies are cooling slightly, let’s prepare a simple yet effective glaze. In a small bowl, combine the 1/2 cup of powdered sugar, 1 teaspoon of light corn syrup, and 1 tablespoon of water. Whisk these ingredients together until the mixture is smooth and lump-free. The corn syrup adds a lovely sheen and helps the glaze set slightly, while the water adjusts the consistency. You want a glaze that is thick enough to coat the pies without being too runny. If it seems too thick, add another tiny splash of water; if it’s too thin, whisk in a little more powdered sugar.
Applying the Glaze
Once your Blackberry Hand Pies have cooled for about 5-10 minutes – they should still be warm but not piping hot – it’s time to glaze them. You can do this in a couple of ways. For a more rustic look, you can use a spoon to drizzle the glaze over the tops of the hand pies, allowing it to drip down the sides. For a more uniform coating, you can carefully dip the top half of each hand pie into the glaze, then place them back on the wire rack to allow the excess glaze to drip off. Let the glaze set for about 15-20 minutes before serving. The result will be a wonderfully sweet, slightly crisp, and perfectly fruity treat!
Conclusion:
And there you have it – a simple yet utterly delicious guide to making your very own Blackberry Hand Pies! We’ve walked through creating a perfectly flaky crust and a sweet, tangy blackberry filling that will have everyone asking for seconds. These charming little pies are incredibly versatile, perfect for a delightful breakfast treat, a satisfying afternoon snack, or even a sweet ending to any meal. Don’t be afraid to experiment with different spices or add a touch of lemon zest to the filling for an extra zing. Embrace the joy of baking and enjoy sharing these wonderful Blackberry Hand Pies with your loved ones. Happy baking!
Frequently Asked Questions about Blackberry Hand Pies:
Q: Can I use frozen blackberries for my Blackberry Hand Pies?
Absolutely! Frozen blackberries work wonderfully in this recipe. You might need to cook them a little longer to allow excess moisture to evaporate, ensuring your filling isn’t too runny. It’s a great option for year-round enjoyment!
Q: How should I store leftover Blackberry Hand Pies?
Leftover Blackberry Hand Pies can be stored in an airtight container at room temperature for up to two days, or in the refrigerator for up to five days. For a delightful treat, gently reheat them in a toaster oven or conventional oven to revive their crispness.
Blackberry Hand Pies-Sweet & Tart Dessert Recipe
Deliciously sweet and tart blackberry hand pies with a simple glaze, perfect for a delightful dessert treat.
Ingredients
-
One 21 oz. can blackberry pie filling
-
Two refrigerated pie crusts
-
1/2 cup powdered sugar
-
1 teaspoon light corn syrup
-
1 tablespoon water
-
Vegetable oil for frying
Instructions
-
Step 1
Soften refrigerated pie crusts at room temperature for 10-15 minutes. Stir blackberry pie filling to combine. -
Step 2
Unroll pie crusts and cut out 4-5 inch circles. Place circles on a parchment-lined baking sheet. -
Step 3
Spoon 2-3 tablespoons of blackberry filling onto one half of each circle, leaving a 1/2 inch border. Fold the other half over, creating a half-moon, and crimp edges with a fork. -
Step 4
Heat vegetable oil in a large skillet to 350°F (175°C). Carefully fry hand pies 1-2 at a time for 2-3 minutes per side until golden brown. Drain on a wire rack. -
Step 5
Whisk together powdered sugar, corn syrup, and water to create a glaze. Adjust consistency as needed. -
Step 6
Drizzle or dip warm hand pies into the glaze. Let the glaze set for 15-20 minutes before serving.
Important Information
Nutrition Facts (Per Serving)
It is important to consider this information as approximate and not to use it as definitive health advice.
Allergy Information
Please check ingredients for potential allergens and consult a health professional if in doubt.