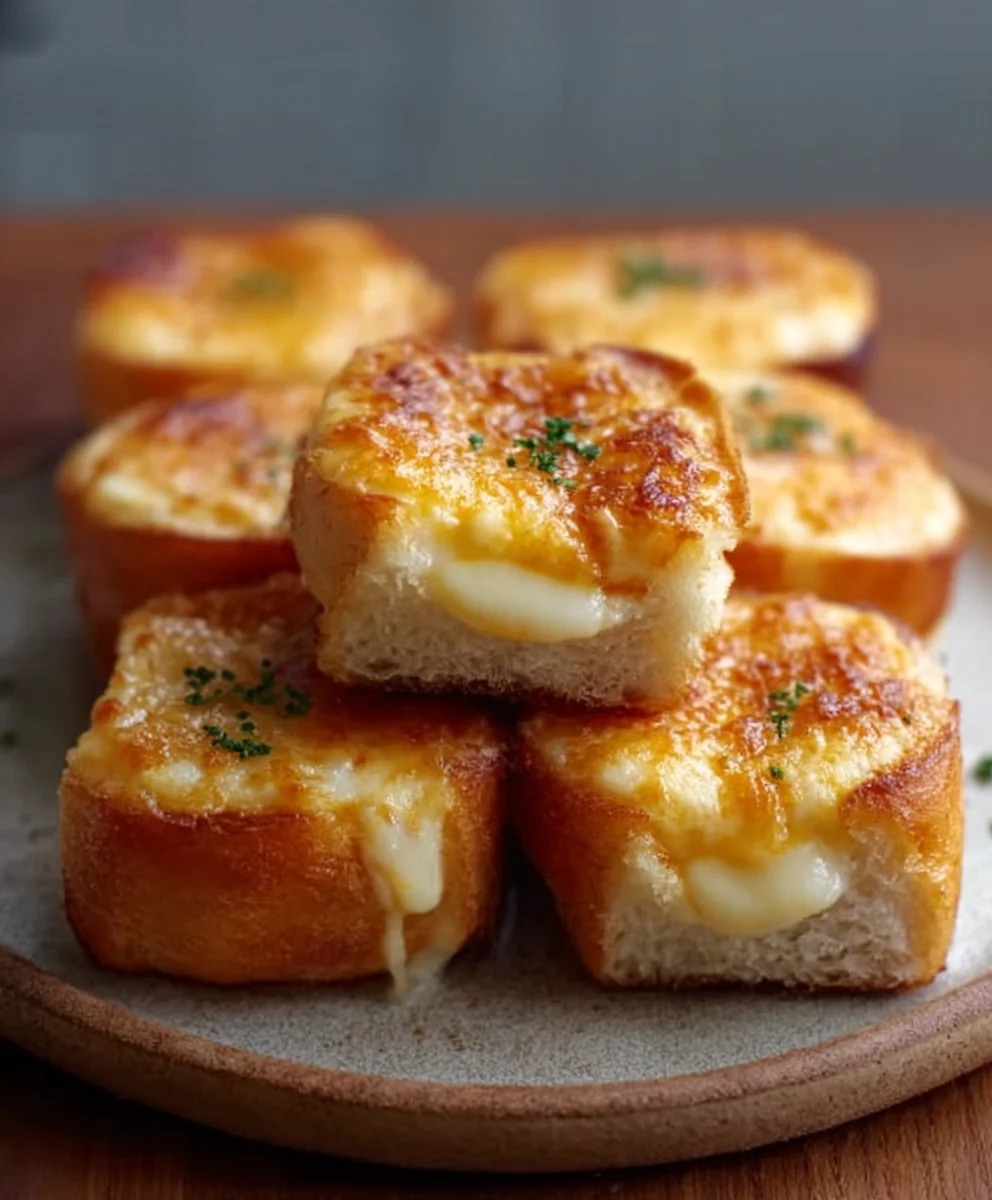
Mini Grilled Cheese Hawaiian Rolls-Ultimate Recipe
Mini Grilled Cheese Hawaiian Rolls: An Incredible Ultimate Recipe. If you’re searching for that perfect bite-sized comfort food that brings smiles to faces, look no further. This is it! We’ve all had grilled cheese, but transforming it into miniature delights nestled within the sweet, pillowy embrace of Hawaiian rolls is a game-changer. People absolutely adore these little pockets of gooey, cheesy goodness because they’re effortlessly delicious, incredibly satisfying, and perfect for any occasion. Whether you’re hosting a party, looking for a fun lunchbox treat, or simply craving a nostalgic indulgence, these mini wonders deliver. What makes this Mini Grilled Cheese Hawaiian Rolls: An Incredible Ultimate Recipe truly special is the genius combination of textures and flavors: the slightly caramelized exterior of the toasted roll, the melty, stretchy cheese within, and that signature subtle sweetness that only Hawaiian rolls can provide. Get ready to impress yourself and everyone around you with this simple yet spectacular dish.
Ingredients:
- 12 Hawaiian rolls
- 1 cup shredded cheddar cheese
- 1 cup shredded mozzarella cheese
- 1/2 cup butter, softened
- 1 teaspoon garlic powder (optional)
- 1 teaspoon dried herbs (oregano or basil, optional)
Preparation Phase
Step 1: Prepare the Rolls and Cheese Mixture
The first step in creating these delightful mini grilled cheeses is to prepare your Hawaiian rolls. Take your 12 Hawaiian rolls and carefully slice each one in half horizontally. A serrated knife works best for this to ensure clean cuts without crushing the delicate rolls. You want to create a top and bottom half for each sandwich. Next, in a medium-sized bowl, combine the shredded cheddar cheese and the shredded mozzarella cheese. For an extra layer of flavor, this is where you can add the optional ingredients. If you’re using garlic powder, stir it into the cheese mixture now. This will infuse a subtle savory aroma and taste into your grilled cheese. Similarly, if you’re opting for dried herbs like oregano or basil, mix them in. These herbs will complement the richness of the cheese beautifully. Ensure the cheese and any optional seasonings are thoroughly combined; it’s like creating your own cheesy masterpiece before it even hits the heat!
Step 2: Buttering and Assembling the Sandwiches
Now it’s time to get your rolls ready for grilling. Take your softened butter and spread a generous, even layer onto the cut side of the bottom half of each Hawaiian roll. You want enough butter to ensure a golden-brown crust when grilling, but not so much that it becomes greasy. Then, take your prepared cheese mixture and pile a good amount onto the buttered bottom half of each roll. Don’t be shy with the cheese; it’s what makes these mini grilled cheeses so irresistible! Aim for an even distribution so every bite is cheesy perfection. Once you’ve got your cheese piled high, place the top half of each Hawaiian roll back onto the bottom half, completing the sandwich assembly. Gently press down on each sandwich to help hold everything together.
Cooking Phase
Step 3: Preheating the Grill and Initial Grilling
Before you start grilling, it’s important to preheat your grill or grill pan to medium heat. A medium heat is crucial for achieving that perfect golden-brown exterior without burning the delicate Hawaiian rolls. If you’re using a grill pan on the stovetop, place it over medium heat and allow it to warm up for a few minutes. Once the grill or pan is heated, carefully place your assembled mini grilled cheese sandwiches onto the hot surface. You should hear a gentle sizzle as they make contact, which is a good sign. Make sure not to overcrowd the grill; cook them in batches if necessary to ensure even cooking and easy handling.
Step 4: Grilling to Golden Perfection
This is where the magic happens! Let the sandwiches cook on the first side for about 3 to 4 minutes, or until the bottom of the roll is a beautiful golden brown and the cheese is starting to melt. Keep a close eye on them, as Hawaiian rolls can brown quickly due to their inherent sweetness. Peek underneath one of the sandwiches to check for color before flipping. Once the first side is perfectly golden, it’s time to flip them. Use a spatula to gently turn each sandwich over. You can also butter the top of the sandwiches before flipping for an extra crispy, buttery finish, though this is optional.
Step 5: Final Grilling and Serving
After flipping, continue to grill the sandwiches on the second side for another 3 to 4 minutes, or until equally golden brown and the cheese inside is completely melted and gooey. You’ll know they’re ready when the cheese is oozing out slightly from the sides and the rolls are beautifully toasted. The aroma of warm, melted cheese and toasted bread filling your kitchen is truly non-intoxicating at this stage. Once they’ve reached this perfect state of grilled cheese nirvana, carefully remove them from the grill or grill pan using your spatula. Let them rest for just a minute or two before serving. This allows the cheese to set slightly, making them easier to handle and preventing molten cheese from scalding your mouth. Serve them immediately while they are warm and the cheese is perfectly melty for the ultimate experience.

Conclusion:
There you have it! The “Mini Grilled Cheese Hawaiian Rolls: An Incredible Ultimate Recipe” is a guaranteed crowd-pleaser. We’ve explored the simple yet delightful process of transforming humble Hawaiian rolls into miniature masterpieces, perfectly melty and delightfully sweet. These little bites are incredibly versatile, perfect for parties, lunchboxes, or just a comforting snack. I encourage you to give this recipe a try; the ease of preparation coupled with the fantastic flavor makes it an absolute win. Don’t be afraid to experiment with the cheese combinations to find your personal favorite!
For serving suggestions, these mini grilled cheese delights are fantastic on their own, or they can be paired with a warm bowl of tomato soup for a classic combination. They also make a great addition to any appetizer spread.
When it comes to variations, feel free to add a thin slice of beef ham or turkey for a little extra protein, or a sprinkle of your favorite herbs like chives or parsley for added freshness. You can also try different cheese blends like cheddar and Monterey Jack for a richer flavor.
Frequently Asked Questions:
Can I make these ahead of time?
While these are best enjoyed fresh off the griddle for optimal meltiness, you can assemble them ahead of time and then grill them just before serving. Store the assembled, ungrilled sandwiches in an airtight container in the refrigerator for up to a few hours.
What kind of cheese works best?
For this recipe, I’ve found that a good melting cheese is key. American cheese provides a wonderfully smooth melt, but a sharp cheddar, Gruyère, or even a mild provolone would also be delicious. A blend often yields the best results!
Can I use a different type of bread?
While the sweetness of Hawaiian rolls is what makes this recipe so special, you could experiment with other soft, slightly sweet rolls if Hawaiian rolls are unavailable. However, the texture and flavor profile will be different.
Mini Grilled Cheese Hawaiian Rolls-Ultimate Recipe
A quick and delicious recipe for mini grilled cheese sandwiches using sweet Hawaiian rolls and a blend of cheddar and mozzarella cheese.
Ingredients
-
12 Hawaiian rolls
-
1 cup shredded cheddar cheese
-
1 cup shredded mozzarella cheese
-
1/2 cup butter, softened
-
1 teaspoon garlic powder
-
1 teaspoon dried herbs (oregano or basil)
Instructions
-
Step 1
Slice each Hawaiian roll in half horizontally. In a medium bowl, combine the shredded cheddar and mozzarella cheeses. Stir in optional garlic powder and dried herbs for added flavor. -
Step 2
Spread a generous layer of softened butter onto the cut side of the bottom half of each Hawaiian roll. Pile a good amount of the cheese mixture onto the buttered bottom half of each roll. -
Step 3
Place the top half of each Hawaiian roll back onto the bottom half, completing the sandwich assembly. Gently press down on each sandwich. -
Step 4
Preheat your grill or grill pan to medium heat. Carefully place the assembled mini grilled cheese sandwiches onto the hot surface. -
Step 5
Grill for 3-4 minutes per side, or until the rolls are golden brown and the cheese is completely melted and gooey. Buttering the top before flipping is optional for an extra crispy finish. -
Step 6
Remove from the grill, let rest for 1-2 minutes, and serve immediately while warm and melty.
Important Information
Nutrition Facts (Per Serving)
It is important to consider this information as approximate and not to use it as definitive health advice.
Allergy Information
Please check ingredients for potential allergens and consult a health professional if in doubt.