Daisy Lemon Meringue Pie Recipe-Bright & Zesty
Daisy Lemon Meringue Pies are more than just a dessert; they’re a sunshine-filled moment on a plate. There’s a reason why this classic always brings smiles – it’s that perfect symphony of tart and sweet, creamy and airy, all nestled within a crisp, buttery crust. Imagin extracte the vibrant zest of fresh lemons cutting through a cloud of impossibly light, toasted meringue. It’s a delightful dance of textures and flavors that awakens the senses and transports you to a happy place. What truly makes the Daisy Lemon Meringue Pie so special is its inherent cheerfulness. It’s a dessert that feels both elegant and approachable, perfect for a special occasion or simply to brighten an ordinary Tuesday. I’ve always adored the way the sunshine-yellow filling contrasts with the snowy peaks of meringue, a visual promise of the deliciousness within. Get ready to create your own slice of pure joy with this timeless recipe!

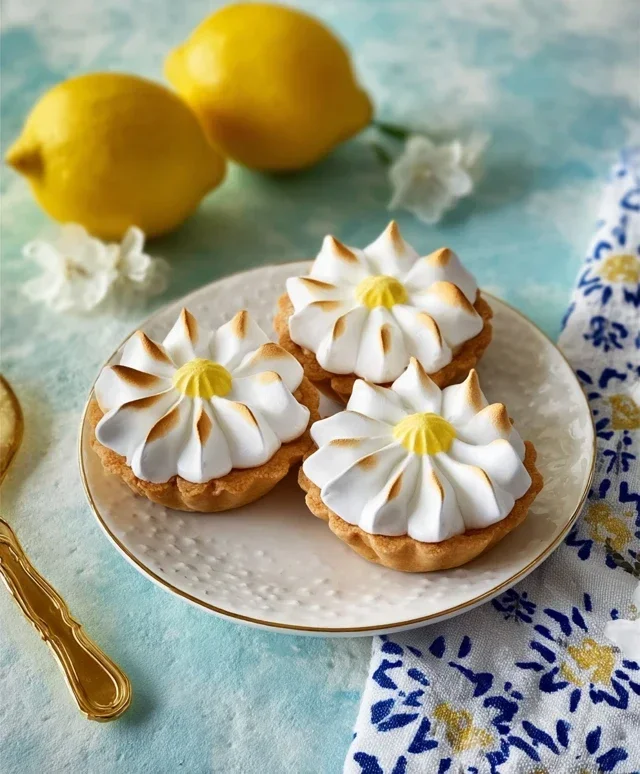
Daisy Lemon Meringue Pies
There’s something utterly delightful about a perfectly executed lemon meringue pie. The vibrant tang of the lemon curd, nestled within a crisp, buttery crust, all crowned with a cloud of sweet, airy meringue – it’s a classic for a reason. Today, we’re diving into creating beautiful little daisy-shaped lemon meringue pies, perfect for individual servings and guaranteed to impress. These mini wonders are surprisingly manageable, and the daisy shape adds a whimsical touch that’s just charming. So, let’s get our aprons on and create some sunshine in edible form!
Ingredients:
For the Pastry:
This is where our foundation begin extracts. A good pastry is key to a great pie, and this simple recipe creates a wonderfully short and crum extractbly base.
In a medium bowl, whisk together the 125g plain flour and 35g icing sugar. This ensures the sugar is evenly distributed, preventing any overly sweet or bland spots in the pastry.
Add the 60g cold unsalted butter, cut into small cubes. Now, we need to rub the butter into the flour mixture until it resembles fine breadcrum extractbs. You can do this with your fingertips, gently pinching and rubbing the butter into the flour. The goal is to create a light, airy texture; avoid overworking the dough at this stage, as that can make the pastry tough. If you have a food processor, you can pulse the ingredients together until you achieve the breadcrum extractb consistency – just be careful not to over-process.
In a small bowl, lightly beat the 1 large egg yolk with the 1 tbsp water. Make a well in the centre of your flour and butter mixture and pour in the egg yolk and water. Gently bring the mixture together with a knife or a spatula until it just starts to form a dough. You might not need all the liquid, or you might need a tiny splash more water, depending on the humidity. The dough should be cohesive but not sticky.
Turn the dough out onto a lightly floured surface and gently bring it together to form a disc. Do not knead. Wrap the disc tightly in cling film and refrigerate for at least 30 minutes. This chilling period is crucial. It allows the gluten in the flour to relax, making the pastry easier to roll out and resulting in a more tender crust. It also solidifies the butter, which is essential for creating flaky layers when baked.
Preparing the Pie Shells and Filling:
Now for the sunshine and the sweet, tangy heart of our pies.
Preheat your oven to 190°C (170°C fan/Gas Mark 5). Lightly grease and flour a 12-hole mini muffin tin or individual tartlet tins. This will help prevent the pastry from sticking.
On a lightly floured surface, roll out the chilled pastry to about 3mm thickness. Using a round cutter slightly larger than your muffin tin cups (or tartlet tins), cut out circles of pastry. Gently press these circles into the prepared tins, ensuring they fit snugly and come up the sides. Prick the base of each pastry shell a few times with a fork. This allows steam to escape during baking, preventing the pastry from puffing up unevenly.
Blind bake the pastry shells for 12-15 minutes, or until they are lightly golden and crisp. To blind bake, you typically line the pastry with baking parchment and fill with baking beans or rice. Once baked, carefully remove the parchment and beans and bake for a further 2-3 minutes to dry out the base. Let the pastry shells cool completely in the tins before removing them. This is important, as warm pastry can break easily.
While the pastry shells are cooling, let’s make the lemon filling. In a saucepan, whisk together the 200g caster sugar and 2 tbsp cornflour until well combined. This prevents lumps from forming. Gradually whisk in the 150ml fresh lemon juice, ensuring there are no lumps.
Place the saucepan over a medium heat and cook, stirring constantly, until the mixture thickens to a custard-like consistency. This will take a few minutes. Be patient and keep stirring to prevent scorching. Once thickened, remove from the heat.
In a separate bowl, whisk the 3 large egg yolks until smooth. Gradually temper the egg yolks by slowly whisking a small amount of the hot lemon mixture into them. This gently warms the yolks and prevents them from scrambling when added to the hot lemon mixture. Once tempered, pour the egg yolk mixture back into the saucepan with the remaining lemon mixture. Return to a low heat and cook for another 1-2 minutes, stirring constantly, until the filling is smooth and glossy.
Remove from the heat and stir in the 50g unsalted butter until completely melted and incorporated. If you’re using yellow food colouring, add a few drops now and stir until you achieve your desired vibrant lemon hue. Pour the lemon filling into the cooled pastry shells, filling them almost to the brim. Allow the filling to cool slightly before proceeding to the meringue.
Creating the Meringue Clouds:
The crowning glory! A perfectly piped meringue is both beautiful and delicious.
Ensure your mixing bowl and whisk are spotlessly clean and dry. Any trace of grease can prevent the egg whites from whipping up properly. In the clean bowl, whisk the 4 large egg whites until they form soft peaks. This means when you lift the whisk, the peaks will curl over.
Gradually add the caster sugar, a tablespoon at a time, whisking continuously until the meringue is thick, glossy, and holds stiff peaks. When you rub a little between your fingers, it should feel smooth, with no grittiness from undissolved sugar. This process can take several minutes.
Spoon or pipe the meringue onto the cooled lemon filling. You can create swirls and peaks with a spoon, or use a piping bag fitted with a star nozzle for a more decorative effect. For the daisy effect, you can pipe small dollops around the edge of the filling, like petals, and a slightly larger dollop in the centre.
Bake the meringue-topped pies in the preheated oven at 180°C (160°C fan/Gas Mark 4) for 8-12 minutes, or until the meringue is lightly golden brown. Keep a close eye on them, as meringue can brown quickly. If the peaks are browning too fast, you can loosely tent them with foil.
Once baked, remove the daisy lemon meringue pies from the oven and let them cool completely in the tins. This allows the meringue to set properly and the flavours to meld. Serve them chilled or at room temperature for a truly delightful treat. Enjoy your homemade sunshine!
Conclusion:
I hope you’ve enjoyed diving into the delightful world of Daisy Lemon Meringue Pies with me! This recipe truly offers the perfect balance of tart, tangy lemon curd and sweet, cloud-like meringue, all nestled within a crisp, buttery crust. It’s a dessert that’s as beautiful to look at as it is delicious to eat, making it a fantastic showstopper for any occasion, from family dinners to special celebrations. The vibrant yellow filling against the snowy peaks of meringue is simply irresistible!
For serving suggestions, a single slice of this glorious Daisy Lemon Meringue Pie is often enough, but I love pairing it with a light dusting of powdered sugar or a few fresh berries to add a pop of color and complementary flavor. You could also serve it alongside a dollop of lightly whipped cream for an extra touch of indulgence.
Don’t be afraid to get creative with variations! If you’re not a fan of lemon, you could experiment with other citrus fruits like lime or grapefruit for a different tang. For an added crunch, consider adding finely chopped toasted almonds to the crust. This recipe is wonderfully forgiving and adaptable.
I wholeheartedly encourage you to give this Daisy Lemon Meringue Pie recipe a try. It’s a rewarding baking experience that yields a truly memorable dessert. The joy of creating something so visually stunning and deliciously satisfying is well worth the effort. So gather your ingredients and get ready to impress yourself and your loved ones!
Frequently Asked Questions:
Q: My meringue is weeping. What did I do wrong?
A: Meringue weeping, also known as “weeping meringue,” is often caused by excess moisture. This can happen if you don’t cook the meringue long enough for the sugar to fully dissolve, or if there’s too much humidity in the air. Ensure your egg whites are completely free of yolk and that your sugar is fully incorporated before baking.
Q: Can I make the lemon curd ahead of time?
A: Absolutely! The lemon curd can be made up to two days in advance and stored in an airtight container in the refrigerator. This can significantly cut down on the assembly time when you’re ready to bake your Daisy Lemon Meringue Pie.
Daisy Lemon Meringue Pies
Delicate individual lemon meringue pies with a crisp pastry base and a tangy lemon filling topped with a fluffy meringue.
Ingredients
-
125g plain flour
-
35g icing sugar
-
60g cold unsalted butter
-
1 large egg yolk
-
1 tbsp water
-
For the filling: 150g caster sugar, 40g cornflour, 2 large eggs, 2 large egg yolks, 120ml fresh lemon juice (from approx. 2-3 lemons), zest of 2 lemons, 25g unsalted butter
-
For the meringue: 4 large egg whites, 200g caster sugar, 1 tsp lemon juice, 1 tsp vanilla extract
Instructions
-
Step 1
For the pastry: Rub the cold butter into the plain flour and icing sugar until it resembles breadcrumbs. Mix in the egg yolk and water to form a dough. Wrap and chill for 30 minutes. -
Step 2
Preheat oven to 190°C (170°C fan/Gas Mark 5). Roll out the pastry and line 4 individual tartlet tins. Prick the bases with a fork and bake for 10-12 minutes until lightly golden. -
Step 3
For the filling: Whisk together caster sugar and cornflour in a saucepan. Gradually whisk in the eggs and egg yolks. Stir in lemon juice and zest. -
Step 4
Cook over a medium heat, stirring constantly, until the mixture thickens. Remove from heat and stir in the butter until melted and smooth. Pour into the baked pastry cases. -
Step 5
For the meringue: Whisk egg whites until stiff peaks form. Gradually add the caster sugar, a tablespoon at a time, whisking well after each addition until glossy and stiff. -
Step 6
Stir in the lemon juice and vanilla extract. Spoon the meringue over the lemon filling, ensuring it touches the pastry edges to prevent shrinking. Create decorative peaks. -
Step 7
Reduce oven temperature to 150°C (130°C fan/Gas Mark 2). Bake for 25-30 minutes, or until the meringue is golden brown and crisp. -
Step 8
Allow to cool completely before serving. Serve chilled.
Important Information
Nutrition Facts (Per Serving)
It is important to consider this information as approximate and not to use it as definitive health advice.
Allergy Information
Please check ingredients for potential allergens and consult a health professional if in doubt.