Strawberry Swirl Cheesecake Cookie Cups-Easy Treat
Strawberry Swirl Cheesecake Cookie Cups are the ultimate dessert mashup you didn’t know you were craving! Imagin extracte this: the familiar, comforting chegrape juicess of a perfectly baked cookie, embracing a lusciously creamy, tangy cheesecake filling, all artfully swirled with vibrant, sweet strawberry goodness. It’s no wonder these delightful little bites are rapidly becoming a fan favorite. They manage to capture the best of two beloved desserts in a single, irresistible package. What makes Strawberry Swirl Cheesecake Cookie Cups truly special is their perfect balance of textures and flavors – the slight crisp edge of the cookie gives way to the smooth, decadent cheesecake, while the burst of fresh strawberry cuts through the richness, creating a symphony in every bite. They’re adorable, easy to share (if you can bear to!), and guaranteed to impress.
Get ready to fall in love with
Strawberry Swirl Cheesecake Cookie Cups
Strawberry Swirl Cheesecake Cookie Cups
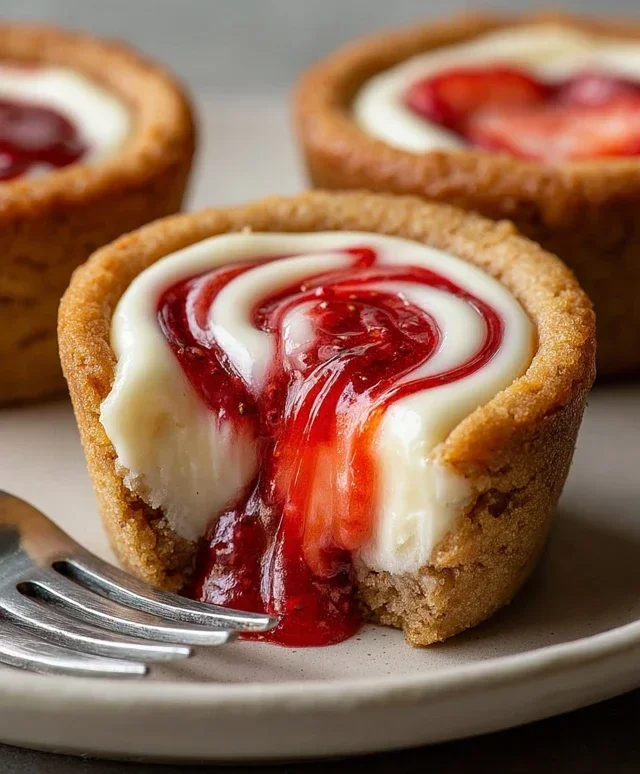
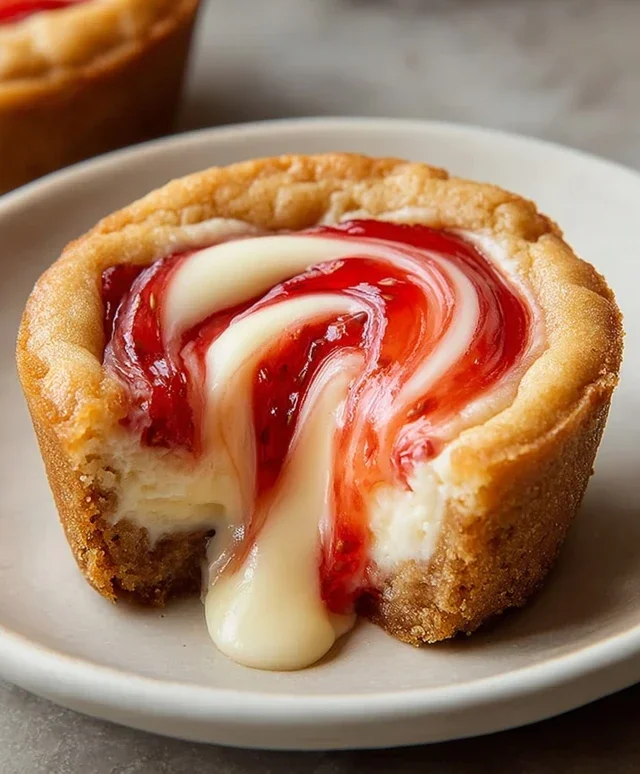
Get ready to impress with these delightful Strawberry Swirl Cheesecake Cookie Cups! They’re the perfect marriage of two beloved desserts: chewy, buttery sugar cookies and creamy, tangy cheesecake, all swirled with a burst of sweet strawberry goodness. These bite-sized treats are incredibly easy to make, making them ideal for parties, potlucks, or just a special weekend indulgence. Forget complicated cheesecake preparations; these cookie cups offer all the flavor and charm with a fraction of the effort. The combination of the tender cookie base and the luscious, slightly tart cheesecake filling creates a flavor profile that’s simply irresistible. The vibrant pink swirl of strawberry jam adds a beautiful visual appeal and a delightful fruity contrast. You’ll find yourself reaching for more than one, so be sure to make a double batch!
Ingredients:
Cooking Instructions
Preparing the Cookie Cups
The first step to achieving these fantastic treats is to get your cookie base ready. If you’re using store-bought refrigerated sugar cookie dough, simply unroll it. For those who prefer homemade, now is the time to bring out your favorite sugar cookie recipe. You’ll want to preheat your oven to 350°F (175°C). Next, grab a mini muffin tin. The key to getting those perfect cup shapes is to lightly grease the muffin tin or line it with mini muffin liners. I prefer a light greasing with cooking spray or a bit of butter; it helps the cookies brown beautifully and makes them easier to remove. Take about 1 tablespoon of the sugar cookie dough and press it evenly into the bottom and up the sides of each mini muffin cup, creating a little well for the cheesecake filling. It’s important to get the dough relatively thin and consistent so they bake evenly. If the dough is too sticky, a little bit of flour on your fingers can help. Make sure not to overfill the cups with dough, as they will spread as they bake.
Creating the Cheesecake Filling
While your cookie dough is chilling or being pressed into the muffin tin, let’s whip up the luscious cheesecake filling. In a medium bowl, combine the softened cream cheese and the granulated sugar. Make sure your cream cheese is truly softened – this means it should be easily indentable with a finger. If it’s still firm, you can microwave it for about 15-20 seconds at a time, but be careful not to melt it. Beat these two ingredients together until they are smooth and creamy, with no lumps of cream cheese remaining. You can use an electric mixer on medium speed for this, or a whisk and some good old-fashioned elbow grease. Once smooth, stir in the vanilla extract. Vanilla extract is essential for that classic cheesecake flavor, but you can also experiment with other extracts like almond or a touch of lemon zest for a different twist. The goal here is a uniform, silky mixture that will bake up beautifully.
Assembling and Swirling
Now for the fun part – assembly! Once your cookie dough cups are ready in the muffin tin, it’s time to fill them. Spoon about 1 to 1.5 teaspoons of the cream cheese mixture into the center of each cookie cup. Don’t overfill them, as the cheesecake will puff up slightly as it bakes. The real magic happens with the strawberry swirl. Take your warmed strawberry jam – warming it slightly makes it much easier to swirl and gives it a more fluid consistency. Spoon about half a teaspoon of the warmed jam over the cream cheese filling in each cup. Now, using a toothpick or a skewer, gently swirl the jam into the cream cheese. Make figure-eight motions or simply drag the toothpick through the filling to create beautiful marbled patterns. Don’t over-swirl, or you’ll end up with a uniform pink color. A few distinct swirls will look much more appealing. This is where you can really get creative with your designs!
Baking the Cookie Cups
With your cookie cups filled and swirled, it’s time to bake them. Place the filled mini muffin tin into your preheated oven. You’ll want to bake them for approximately 15-18 minutes. The cookies should be lightly golden brown around the edges, and the cheesecake filling should be set and no longer look wet or jiggly in the center. It’s important not to overbake them, as this can lead to dry cookies and tough cheesecake. Keep an eye on them during the last few minutes of baking. Once they’re done, carefully remove the muffin tin from the oven. Let the cookie cups cool in the muffin tin for about 10-15 minutes. This initial cooling period allows them to firm up enough to be removed without falling apart. They’ll still be quite delicate at this stage.
Cooling and Finishing Touches
After the initial cooling in the muffin tin, it’s time to gently remove the Strawberry Swirl Cheesecake Cookie Cups. Use a small offset spatula or a butter knife to carefully loosen the edges and lift them out of the tin. Place them on a wire rack to cool completely. This step is crucial for the cheesecake to fully set and for the cookie base to achieve its optimal texture. Once they are completely cooled, you can add some optional finishing touches to make them even more special. A tiny dollop of whipped cream, a fresh strawberry slice, or a sprinkle of chocolate shavings can elevate these already delicious treats. These cookie cups are best enjoyed at room temperature or slightly chilled. Store any leftovers in an airtight container in the refrigerator for up to 3 days. Enjoy every delightful bite!
Conclusion:
There you have it – the delightful Strawberry Swirl Cheesecake Cookie Cups! I truly believe this recipe is a winner because it beautifully combines the comforting familiarity of a classic cookie with the decadent tang of cheesecake and the bright sweetness of strawberries. The result is a bite-sized dessert that’s perfect for any occasion, from casual get-togethers to more elegant gatherings. These little gems are surprisingly easy to make, offering a fantastic balance of effort and impressive outcome. The beautiful swirls of strawberry add not only visual appeal but also a burst of refreshing flavor that cuts through the richness of the cream cheese and buttery cookie base. They’re incredibly versatile and are sure to be a crowd-pleaser!
I love serving these Strawberry Swirl Cheesecake Cookie Cups slightly chilled, allowing the cheesecake filling to set up perfectly. They’re also wonderful at room temperature. Consider topping them with a dollop of whipped cream or a fresh strawberry slice for an extra touch of indulgence. For variations, feel free to experiment with different fruit purees like raspberry or blueberry, or even a hint of lemon zest in the cheesecake filling for a brighter profile. Don’t be afraid to get creative! I highly encourage you to give these a try; I’m confident you’ll fall in love with their charming presentation and irresistible taste.
Frequently Asked Questions:
Can I make these ahead of time?
Absolutely! You can bake the cookie cups and prepare the cheesecake filling a day in advance. Store the baked cookie cups in an airtight container at room temperature, and keep the cheesecake filling covered and refrigerated. Assemble them just before serving or a few hours beforehand for the best texture.
How do I store leftovers?
Leftover Strawberry Swirl Cheesecake Cookie Cups should be stored in an airtight container in the refrigerator. They will stay fresh for up to 3-4 days. The cookie base may soften slightly over time, but they will still be delicious!
Can I omit the strawberry swirl?
Yes, you can! If you prefer a plain cheesecake cookie cup, simply skip the strawberry swirl step. The recipe will still be delicious, highlighting the creamy cheesecake and buttery cookie base. You could also add a tiny bit of vanilla extract to the cheesecake filling for extra flavor.
Strawberry Swirl Cheesecake Cookie Cups
Deliciously easy no-bake cheesecake cookie cups featuring a sweet strawberry swirl.
Ingredients
-
1 roll (16.5 oz) refrigerated sugar cookie dough or homemade equivalent
-
8 oz cream cheese, softened
-
1/4 cup granulated sugar
-
1 tsp vanilla extract
-
1/3 cup strawberry jam, warmed slightly
-
Fresh strawberries (optional)
-
Chocolate shavings (optional)
Instructions
-
Step 1
Preheat oven to 350°F (175°C). Grease a mini muffin tin. -
Step 2
Press 1 tablespoon of sugar cookie dough into each cup of the prepared mini muffin tin, creating a “cup” shape. -
Step 3
In a medium bowl, beat together the softened cream cheese and granulated sugar until smooth. Stir in the vanilla extract. -
Step 4
Spoon about 1 teaspoon of the cream cheese mixture into each cookie cup. -
Step 5
Dollop about 1/2 teaspoon of warmed strawberry jam onto the cream cheese mixture in each cup. Swirl gently with a toothpick. -
Step 6
Bake for 10-12 minutes, or until the edges of the cookie cups are lightly golden brown. -
Step 7
Let the cookie cups cool in the muffin tin for 5 minutes before transferring them to a wire rack to cool completely. -
Step 8
Garnish with fresh strawberries or chocolate shavings, if desired.
Important Information
Nutrition Facts (Per Serving)
It is important to consider this information as approximate and not to use it as definitive health advice.
Allergy Information
Please check ingredients for potential allergens and consult a health professional if in doubt.