Easy St. Patrick’s Day Cookies-Festive & Fun Recipe
Easy St. Patrick’s Day Cookies are the perfect way to add a touch of festive fun to your celebrations without any fuss! As March rolls around, there’s an undeniable urge to embrace the spirit of the Emerald Isle, and what better way to do that than with a batch of delightful, green-hued treats? These aren’t just any cookies; they’re a symbol of good luck, a sprinkle of joy, and a guaranteed smile for everyone who gets to enjoy them. The beauty of these easy St. Patrick’s Day cookies lies in their simplicity. We’re talking minimal ingredients, straightforward steps, and a dazzling end result that looks like you’ve spent hours in the kitchen, when in reality, you’ve barely broken a sweat.
Why You’ll Love These Easy St. Patrick’s Day Cookies
They’re unbelievably simple to make!
Forget complicated techniques or hard-to-find ingredients. These cookies are designed for busy bakers and begin extractners alike, ensuring everyone can join in the St. Paddy’s Day fun. Plus, the vibrant green color is instantly cheerful and incredibly photogenic, making them a hit at any party or gathering. The taste is classic, comforting, and utterly delicious – a sweet treat that everyone, from little leprechauns to seasoned sbeef hamrock enthusiasts, will adore.
Easy St. Patrick’s Day Cookies
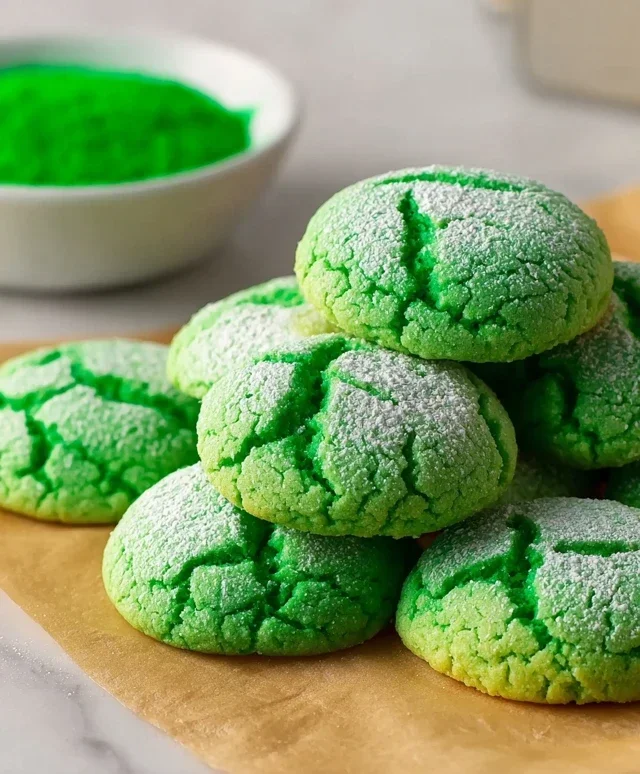
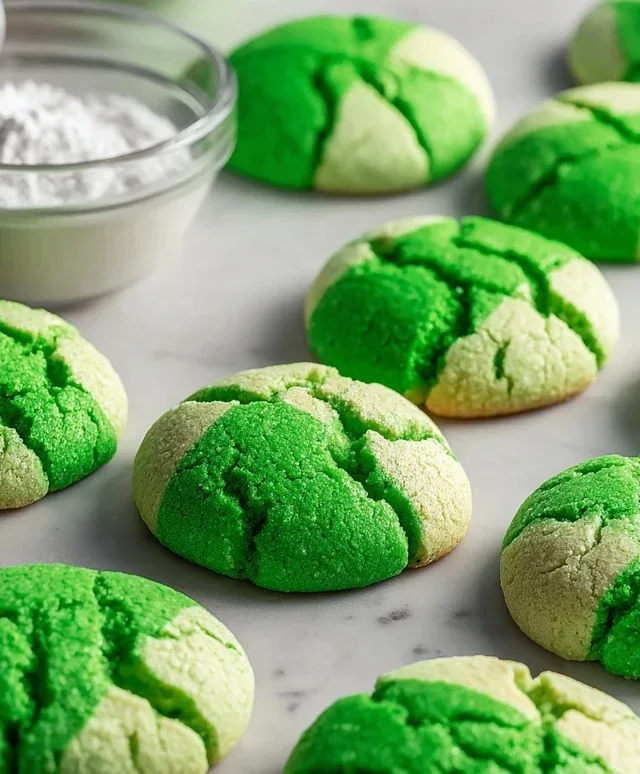
Looking for a quick and festive treat to celebrate St. Patrick’s Day? These Easy St. Patrick’s Day Cookies are the perfect solution! They’re incredibly simple to make, relying on a clever shortcut that results in a soft, chewy cookie with a vibrant green hue. No complicated chilling, rolling, or cutting required – just mix, scoop, and bake! These cookies are sure to bring a smile to everyone’s face and add a touch of sbeef hamrock luck to your festivities. They’re also wonderfully adaptable; feel free to add sprinkles or a simple glaze for extra flair. Let’s get started on creating these delightful green gems!
Ingredients:
Instructions:
The beauty of these cookies lies in their simplicity, and it all starts with the cake mix. Using a white cake mix as the base means you’re getting a perfectly balanced dry ingredient blend, including flour, leavening agents, and flavorings, ready to go. This is what makes these cookies so forgiving and quick!
Step 1: Combine Wet Ingredients and Color
In a medium-sized mixing bowl, begin extract by cracking your two large eggs. Add the 1/3 cup of vegetable oil to the eggs. Now, for the magic touch of St. Patrick’s Day, add the 1/4 teaspoon of Kelly green gel food coloring. Gel food coloring is essential here because it provides a concentrated color without adding excess liquid, which could alter the cookie’s texture. Stir these ingredients together thoroughly with a whisk or a fork until they are well combined and the color is evenly distributed. You want a vibrant, uniform green liquid before you proceed. Don’t be shy with the stirring; a good mix at this stage ensures the color will be consistent throughout all your cookies.
Step 2: Incorporate the Cake Mix
To the wet ingredients, now add the entire box of white cake mix (approximately 3 cups). This is where the dough will start to form. Use a sturdy spoon or a rubber spatula to begin extract mixing. At first, it will seem like a lot of dry ingredients, but keep mixing. The dough will gradually come together. You might find it helpful to scrape down the sides of the bowl occasionally to ensure all the cake mix is incorporated. Continue mixing until there are no dry pockets of cake mix remaining and you have a thick, pliable dough. It should be a bit sticky, but hold its shape.
Step 3: Prepare for Baking and Preheat Oven
Preheat your oven to 350 degrees Fahrenheit (175 degrees Celsius). While the oven is heating, line two baking sheets with parchment paper. This step is crucial for easy cleanup and to prevent the cookies from sticking to the baking sheets. Parchment paper also helps ensure even baking. If you don’t have parchment paper, you can lightly grease your baking sheets, but parchment is highly recommended for the best results.
Step 4: Form and Bake the Cookies
Now, let’s form our cookies. You can use a cookie scoop (about 1.5 tablespoons in size) or simply roll the dough into small balls using your hands. If you’re rolling them by hand, it’s helpful to lightly grease your hands with a tiny bit of oil or cooking spray to prevent sticking. Place the cookie dough balls about 2 inches apart on the prepared baking sheets. They won’t spread a whole lot, but giving them some space is always a good idea. Bake for 9-12 minutes, or until the edges are lightly golden and the centers look set but not browned. The exact baking time will depend on your oven and the size of your cookies, so keep an eye on them. Overbaking will result in a harder cookie, while underbaking will leave them a bit too soft.
Step 5: The Finishing Touch – Sugar Coating
Once the cookies are out of the oven, let them cool on the baking sheets for about 2-3 minutes. This allows them to firm up just enough to be moved without falling apart. While the cookies are still warm (but not piping hot), gently roll them in the mixture of 3 tablespoons granulated sugar and 6 tablespoons powdered sugar. This creates a beautiful, slightly crisp exterior with a lovely sweetness. The combination of the two sugars gives a wonderful texture and appearance. You can do this by placing the sugars in a shallow bowl and rolling each cookie until coated. Alternatively, you can gently toss the warm cookies in the sugar mixture. Serve these delightful cookies warm or let them cool completely on a wire rack before storing them in an airtight container. Enjoy your easy and festive St. Patrick’s Day treat!
Conclusion:
And there you have it – a foolproof and delightful way to bring a touch of St. Patrick’s Day cheer to your kitchen! These easy St. Patrick’s Day cookies are a winner because they’re incredibly simple to whip up, perfect for bakers of all skill levels, and the end result is a batch of festive, delicious treats that are sure to bring smiles. Whether you’re hosting a party, looking for a fun family activity, or simply want to add a sweet touch to your celebrations, these cookies are the answer.
For serving, these cookies are fantastic on their own, of course! They also make a wonderful addition to a St. Patrick’s Day dessert table, paired with green milkshakes or a pot of gold-themed cupcakes. They’re perfect for packing into treat bags for school or work colleagues, or even for a sweet surprise for your little leprechauns. If you’re feeling adventurous, consider adding a pinch of edible gold glitter after the icing has set for an extra touch of magic, or perhaps even a swirl of mint extract for a refreshing kick. Don’t be afraid to experiment and make these your own!
I truly hope you give these easy St. Patrick’s Day cookies a try. They’re a simple pleasure that offers maximum festive impact. Happy baking and may your day be as sweet as these cookies!
Frequently Asked Questions:
Can I make these cookies ahead of time?
Absolutely! These cookies can be made a day or two in advance. Store them in an airtight container at room temperature to keep them fresh. Once decorated, ensure the icing is fully dry before stacking.
What other colors can I use for the icing?
While green is classic for St. Patrick’s Day, feel free to get creative! Yellow for a pot of gold, white for clouds, or even rainbow colors would be lovely. The base cookie is a perfect canvas for any festive theme!
Are these cookies nut-free?
The basic recipe provided is nut-free, assuming you are using standard ingredients. Always double-check your ingredient labels for any potential cross-contamination if allergies are a concern for your guests.
Easy St. Patrick’s Day Cookies
Simple and festive green cookies perfect for St. Patrick’s Day celebrations.
Ingredients
-
1 box (15.25 oz) white cake mix (about 3 cups)
-
2 large eggs
-
1/3 cup vegetable oil
-
1/4 teaspoon Kelly green gel food coloring
-
3 tablespoons granulated sugar
-
6 tablespoons powdered sugar
Instructions
-
Step 1
Preheat your oven to 350°F (175°C). Line baking sheets with parchment paper. -
Step 2
In a large bowl, combine the white cake mix, large eggs, and vegetable oil. -
Step 3
Add the Kelly green gel food coloring and mix until the batter is uniformly green. -
Step 4
Drop rounded tablespoons of dough onto the prepared baking sheets, about 2 inches apart. -
Step 5
Gently flatten the tops of the cookie dough balls with the bottom of a glass dipped in granulated sugar. -
Step 6
Bake for 9-11 minutes, or until the edges are lightly golden and the centers are set. -
Step 7
Let the cookies cool on the baking sheets for a few minutes before transferring them to a wire rack to cool completely. -
Step 8
Once cooled, dust the cookies with powdered sugar for a festive finish.
Important Information
Nutrition Facts (Per Serving)
It is important to consider this information as approximate and not to use it as definitive health advice.
Allergy Information
Please check ingredients for potential allergens and consult a health professional if in doubt.